Pages

Tuesday, September 11, 2012

Drupal 8 Roadmap


Here are the top things you need to know about Drupal’s next big evolution.
Mobile-Friendly and Responsive
The biggest change coming in Drupal 8 is the built-in support for mobile. Drupal aims to be a leading platform for mobile content creation and consumption. 
Drupal's built-in themes are being converted to a responsive HTML 5 approach, and so are the admin tools (see a mockup* for an example). In Drupal 8, it will be the norm to view Drupal sites on mobile devices as well as to update and maintain them.
In addition, Drupal 8 will have tools to power both web apps and native apps built for different mobile platforms like iOS and Android. Drupal 8 will provide better Web Services to deliver content and interactivity to native mobile apps. D8 will be the invisible engine behind snappy, fun mobile apps that rely on widely contributed content and data.
What about your existing Drupal mobile sites?  Because so much will change in D8 for mobile, your existing solutions may need to be retooled.  If you have a home-grown mobile solution powered by Drupal, you may be able to leverage some of your work moving forward.  If you use modules such as Mobile Tools, you should expect them to change dramatically for Drupal 8 or be partially replaced by core functionality.
But don't hold off on going mobile just because of the coming changes in D8. The mobile revolution is moving fast and your users expect mobile solutions from you today. See our Tips to Prepare for Drupal 8 below while you build your mobile solutions today.
To learn more, follow the official MobileHTML 5 and Web Services initiatives for Drupal 8.
Drag-n-Drop Layouts
A new initiative for Drupal 8 aims to introduce tools for managing blocks, menus and page layout all in one comprehensive UI. The popular Panels module and the Page Manager module are two models that are strongly influencing the planning.  
If this initiative is successful, some kind of drag-n-drop layout tool will appear in Drupal 8. To learn more, follow this new Blocks & Layouts Everywhere Initiative online.
Dev - Staging - Live
An age-old weakness of previous Drupal versions is the difficulty managing Drupal setting and configuration changes.  Because Drupal's database stores settings and configuration along-side content, it is difficult to establish an effective workflow for moving configuration changes from Development sites to Staging/Testing sites and finally on to Live sites.
This weakness may finally be solved in Drupal 8. The Configuration Management Initiative is working on new ways of storing configuration separately from content.  
The current designs for this new functionality include signed JSON files and a new "Config" API to hold and access all configuration information in one place. This will allow configurations to be managed and moved as files using version control or with other software tools and pluggable back-ends.
Powered by Symfony
Drupal 8 will be adopting components of Symfony, an open-source web development framework. Symfony is a PHP framework this allows developers to use one or more of its components to build web applications quickly.
Drupal 8 is planning to adopt some Symfony components such as HttpKernel, Routing and ClassLoader. These components will power core functionality such as HTTP request handling, routing requests to the right handlers, and loading PHP Classes.
These new underpinnings should make developing with Drupal more effective and give Drupal more modern, object-oriented code. A key goal is to reduce the barriers to entry for developers to work with and contribute to Drupal. This probably matters most to programmers (those developing Drupal modules and Drupal core). But a more pleasing and efficient environment for developers should benefit everyone who is using Drupal.

More Functionality in Core
Should Drupal core include a WYSIWYG editor? Media handling? The Views module? These tools, and others, are used by nearly every Drupal website, but they are currently not distributed as part of Drupal core. After downloading Drupal, users must download and install all of these other tools as add-on modules in order to have enough functionality to build a modern website.
At DrupalCon Denver, project lead Dries Buytaert lead a conversation about what belongs in Drupal core. The community of contributors who actually create Drupal core has significant disagreement and growing pains over the questions of whether more functionality should be bundled into Drupal core or not. Dries and the community discussed pros and cons of a “big core,” “small core” or a “lieutenant” model for expanding core.  
Although no final decisions were made in Denver, there is a coalescing understanding that Drupal core will be larger, not smaller. The kinds of critical functionality such as WYSIWYG editors, media handling and Views are recognized as critical for building most websites today. And Drupal core needs to include these kinds of functionality to be an effective Web CMS out of the box.
Other Initiatives
There are also active initiatives for Multilingual improvements to Drupal core as well as aDesign initiative to develop a new Drupal core theme.
At DrupalCon Denver, Dries stated that he still wants to adopt a few more official initiatives for Drupal 8. The success of any initiative depends on the volunteers who contribute code to Drupal as an open source community effort.  So it is up to the community to determine what exactly ends up shipping in Drupal 8.
Timeline
We predict that Drupal 8 will be released between August 2013 and April 2014.  
Here are the current target dates that project lead Dries Buytaert has announced:
  • Dec. 1, 2012: Feature Freeze (no new big features will be added after this date; the focus is just on polish and fixing bugs).
  • Feb. 1, 2013: Code Freeze (after this date, no more changes to API or strings are allowed; only bug fixes will be accepted).
  • August 2013: Release Date Target (this is Dries' target date; Drupal 8 will be released and Drupal 6 will be discontinued at that time).
  • August 2013 to April 2014: Release Date Prediction (this is Pixo's prediction based on past experience).
  • Aug. 2014 to April 2015: Stability and Maturity of Drupal 8 (this is Pixo's prediction; see Hurry Up and Wait below).
Remember, Drupal is an open source product. That brings huge advantages — it will always be free to use and it will never go out of business or be phased out by a corporate takeover. But the improvements in Drupal 8 rely heavily on volunteer programmers and contributions from the Drupal Community. So the exact timeline is subject to change.
Be Prepared to Migrate
The move to any new Drupal version can be complex and labor-intensive.  It is important for organizations to begin budgeting and planning for this migration in advance of the “drop dead date.”
When version 8 is released, Drupal 6 will no longer be maintained. At that point, no more security updates will be available and it will be important for any Drupal 6 sites to be quickly migrated to Drupal 7. It is also possible to "skip a version" and migrate to Drupal 8. Either of these may be best depending on each site's individual circumstances. (Contact Us if you would like a cost estimate or guidance.)
Hurry Up and Wait
Once Drupal 8 is released, we still recommend careful evaluation of each site's needs before making the move. It may be important to wait for some modules critical to your site to become available.
After Drupal 7 was released, it took roughly 12 months before many critical add-on modules were stable and for the ecosystem of the new version to be stable and mature. We expect the same after the release of Drupal 8.  
It is not uncommon for enterprise Drupal sites to be using 100 or more add-on modules. Many of those may be discontinued and never become available for the next version of Drupal, while others may be available albeit with a rocky, manual upgrade path.
4 Tips to Prepare for Drupal 8
  1. Use Core Functionality: In the modules you are choosing or in the solutions you are building, make sure to leverage what Drupal core provides rather than reinventing the wheel. For example, Drupal 7 fields (CCK) in core and entity data structures should be leveraged so that your data will have a clean upgrade path for the future.
  2. Be Modular: Make your work and customizations as modular as possible. If you need to rework your approach in a future version of Drupal, you'll want your code to be broken into small chunks with clear APIs.
  3. Stick to Proven Modules: Be very careful when selecting or adding Drupal modules. Check the module page to make sure there is a solid history of stable releases. Check the usage statistics at the bottom and look for modules with more than 10,000 active sites. The best plan is to use as few modules as possible — the easiest module to upgrade is the module you never used at all!
  4. Beware of Areas in Flux: As you grow or build sites in Drupal 6 or 7, be warned that the areas described above such as Mobile and Multilingual will change a lot. You may need to rebuild those aspects of your site as you adopt Drupal 8. That is not a reason to wait on adding functionality that you need now, but it is a reason to monitor those areas of Drupal 8’s development and be ready to rework your solutions to fit the Drupal 8 paradigm.

Saturday, September 8, 2012

50 Drupal Tips and Tricks


DRUPAL ADMIN AND CONFIGURATION:

  1. Create a "HTML help" block and assign it to appear on only "node/*/edit" and "node/add/*"
  2. Use the "edit permissions" link on admin/user/roles to get a single column
  3. Use the Firefox Web Developer Toolbar to "Populate Form Fields" on the access page for the admin role
  4. Use "site:drupal.org {search terms}" to search all of drupal.org with
    Google. Set up a Firefox shortcut so you can type "dru [your search]" to
    search Drupal. Also api.drupal.org/apis/{search_term}
  5. When using pathauto to alias usernames, don't let users change their usernames.
  6. Use PathAuto and Path Redirect together to redirect old aliases to the new ones. Search engines will love you.
  7. Use Global Redirect to make sure home page is "/" and current page doesn't have an alias.
  8. When creating PathAuto template, keep uniqueness in mind -- perhaps add a date to your blog and news entries.
  9. Move the "My Account" menu item by creating a custom menu item at 'user'
  10. Use update_status module along with cvs_deploy & cvs tags to manage sites
  11. Use ImageCache to resize images. It's worth the poor u.i. and configuration challenges. Tastes best with ImageField, CCK, and Views.
  12. Turn any CCK type with an imagefield into a photocast with ConTemplate
  13. Use Automatic Node Titles whenever you want to have separate (CCK) fields for first name and last name, but you want the node title to contain the full name.
  14. Use SimpleMenu to remove the need for an admin block on the page.
  15. Set your site in "offline mode" when doing Drupal upgrades, to ensure that your end users are never exposed to any funky errors.
  16. Use locale.module to change English text into other English text. Example: change "Forums" to "Message Boards". Slight performance issue for high-traffic sites. In Drupal 6, there's a new "locale lite" feature to translate only a few pieces of interface text without the overhead of locale module itself. Check the bottom of default.settings.php for more details.
  17. Use views + views_fastsearch to build "section search" or custom advanced search pages

DRUPAL.ORG

  1. Enable the contributor block on drupal.org. This will give you access to all kinds of useful links, as well as tell you how close we are to releasing Drupal 6.
  2. Check out the Drupal Planet at http://drupal.org/planet to keep up to date on exciting developments and what various folks are working on.
  3. Post suggestions or bugs you find with Drupal or contributed modules to the issue queues, not on the forums. They're much more likely to get attention from developers there.
  4. Check out http://drupal.org/node/10259 for some tips on posting to the issue queue, including how to make a good bug report/feature request, how patches get reviewed, and so on.
  5. Head to http://drupal.org/videocasts to view a categorized archive of various Drupal videos and presentations on a variety of subjects.
  6. Sign up for the security announcements at http://drupal.org/security to keep on top of your updates!
  7. Ninja search #1: Negative words. Eliminate the words you don't want with a minus in front: -Joomla

    Ninja search #2: Content types: type:forum or type:image etc.

    Ninja search #3: Phrase search. Put exact phrases in "", as in "Drupal rocks".

THEMING

  1. Set up a quick "wireframe" site using Zen or another simple theme. Show this and the HTML it outputs to your web designer before they start working. Point out items like tabs and messages.
  2. Change your administration theme when working on a new theme
  3. Get to know Firebug for ALL front-end development: JavaScript and CSS!
  4. <?php
    var_dump
    (get_defined_vars()); ?>
    inside any template file to see what variables are available.
  5. Create a hook_link_alter() and add a "More..." link to the end of the Teaser text while removing the Read more link
  6. The format_interval() function
    is cool. It outputs "X minutes Y seconds ago", or similar...
  7. Accommodate page caching by substituting dynamic page elements in your theme.
    If the user is not logged in, use absolute values such as "posted on {date}
    at {time}", rather than relative such as "{X} hours, {Y} seconds ago".

VIEWS

  1. Use theme('view', {arguments}) to embed a view anywhere in your theme's template.php or .tpl.php files
  2. Use the custom argument handling code in a View to change anything about a view: filters, number displayed, fields, and of course arguments. You can alter these items with or without conditionals. Change the number of columns in a grid view; change the number of items that appear if the "feed" argument is present; etc... (see #36 to see the view object)
  3. Use "promote to front page" / "sticky" to do other things using Views... see alsoViews Bookmarks
  4. Use Views + Taxonomy
    Redirect
     to use a custom view for each vocabulary's listing pages.
  5. Use print_r($view) inside the 'Argument code' field of a View to see the view object. see #33 (oops)
  6. Give any number of 'block'-only views the same page URL, and their [more] links will all point to the same page.

JAVASCRIPT

  1. Translate your javascript by doing
    <?php
    drupal_add_js
    (array('my_module' => array('my_string' => t('My string'))), 'setting')?>
    Get translated strings from javascript: Drupal.settings.my_module.mystring
  2. Same with urls:
    <?php
    drupal_add_js
    (array('my_module' => array('my_url' => url('node/10'))), 'setting'?>
    It's more reliable and less work than using $base_path and Clean URL setting.

DRUPAL DEVELOPMENT AND CODING

  1. DON'T HACK DRUPAL
  2. Many IDEs (Zend, Komodo, Eclipse) will parse Drupal's code base and give you autocomplete and documentation on the function names
  3. Run a local copy of api.drupal.org (using api.module) -- parse contrib modules! Documentation here: http://drupal.org/node/26669
  4. Figure out arg(), you won't be sorry.
  5. Use $_GET['q'] anywhere in your site to get the real Drupal path (not what's in the menu bar)
  6. Find out if the current user is logged in:
    <?phpif ($GLOBALS['user']->uid) {/* the user is logged in */?>
  7. In Drupal 6, the contrib Schema module will generate a full-documented list of Drupal's tables. See http://jaspan.com/drupal-6s-self-documenting-database-schema and http://drupal.org/node/184586.
  8. Use cvs annotate to track down the hows and whys of a particular line of code. View a how-to at http://www.lullabot.com/articles/cvs_annotate_or_what_the_heck_were_they_thinking
  9. Coder module can not only be used to check over code for coding standards compliance, but can also be used to notify you of things that need to be done to your module to upgrade it to the next Drupal version.
  10. On api.drupal.org, you can use the "List references" tab on any function to view where else in the source it's called, as well as what other functions are called by the function you're looking at. This can be helpful if you have a question about how a function is used.
  11. Drush!

Friday, September 7, 2012

4 Steps to Building a Portfolio Website Using Drupal


4 Steps to Building a Portfolio Website Using Drupal
If you’re building a website for a client or yourself that requires a number of images to be presented in a gallery format — for example, if you’re a web designer, photographer, sculptor, painter or graphic designer — Drupal has some out-of-the-box solutions to help you organize and present your information.
Professionals who work on a visual medium often need help presenting (and possibly monetizing) their work, and an online gallery is a great way to do this. Perhaps you could also make the images available as physical products or digital downloads in an online store as an added option.
This guide will show you how to develop a portfolio/image gallery website using the popular content management system, Drupal.

Prerequisites

For this guide, you will need basic working knowledge of Drupal and a clean installation of the Acquia Drupal distribution ready to go.
The following guide might be helpful to read for new Drupal users:
  • Getting Started with Drupal: A Comprehensive Hands-On Guide
Here are the Drupal modules we’ll be using:
Below, you’ll be instructed to navigate to certain sections of Drupal. You will have to replace http://example.com with your domain name where you have Drupal set up.
Let’s get started!

Step 1: Gather the Information to Display

Use Drupal’s module manager to enable the following modules:
  • Image (enables you to use images)
  • Image Gallery (pre-built gallery functionality)
  • Image Attach (functionality to add images to pages and other types of posts)
  • Image Import (to batch upload a number of image files)
  • Lightbox 2 (if desired)
  • CCK Content (to edit the "Image" content type)
  • CCK Number (to add new number fields to the "Image" content type)
  • CCK Text (to add new text fields to the "Image" content type)
The typical project to display in a gallery-style website would have specific fields that display only on a per-project basis. These could include things like the image itself, the image’s title, the creation date, the medium and a description of the image.
Go through the body of work and identify the types of information that are important to display for each item in the gallery. You may be able to skip this step if all you need is the title and a description of the gallery item.
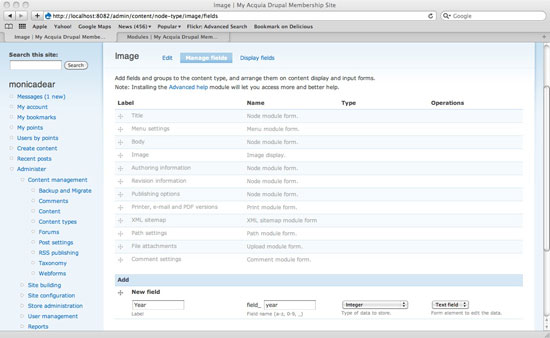
If you need more, then use CCK to add new fields to the "Image" content type by navigating to:
Admin menu > Content management > Content types > Edit Image > Manage fields
Direct URL:
http://example.com/admin/content/node-type/image/fields
This will enable you to collect more information about each image (again, specific to the type of gallery being displayed).
Note that the name of each gallery may be specified in advance by going to:
Admin menu > Content management > Image galleries > List
Direct URL:
http://example.com/admin/content/image/list
If no gallery has been prepared yet, you can create one by going to:
Admin menu > Content management > Image galleries > Add Gallery
Direct URL:
http://example.com/admin/content/image/add      

Step 2: Import the Images

You may upload images one at a time using the "Add image" functionality:
Admin > Content management > Create content > Image
Direct URL:
http://example.com/node/add/image
The default version lets you add a title and description. Because we enabled the Image Attach module, you can therefore attach an image to this node.
The following describes how to upload an image from your hard drive, and assign it to its gallery (if it’s destined to have one).
If you have a number of photos to upload at the same time, you could first put them all in one folder on your desktop or hard drive to make them easier to organize and access.
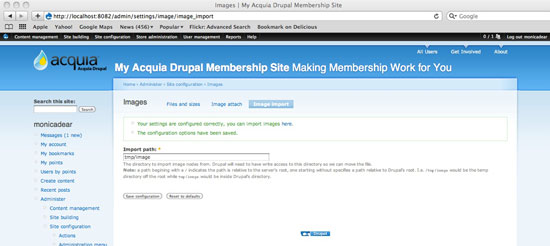
Next, go to the Image Import settings:
Admin > Site configuration > Images > Image import
Direct URL:
http://example.com/admin/settings/image/image_import
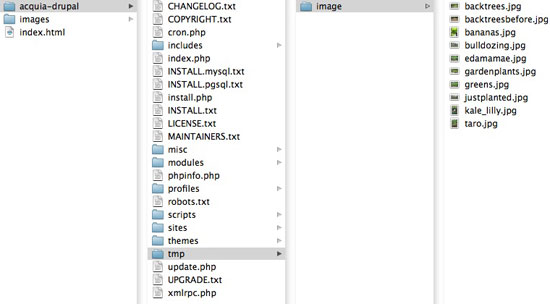
Follow the instructions to create a "temporary" folder somewhere in your web server. You may need to use FTP to create the folder (especially if you are using shared hosting).
Here is the equivalent tmp/image file on the hard drive:
FTP all of the images that you want to make available to your Drupal website, putting them in this temporary directory.
Note that you can automatically create new image galleries by creating sub-directories. For example, with the path tmp/image/gallery1/foo.jpg, the image foo.jpgwould be part of gallery1.
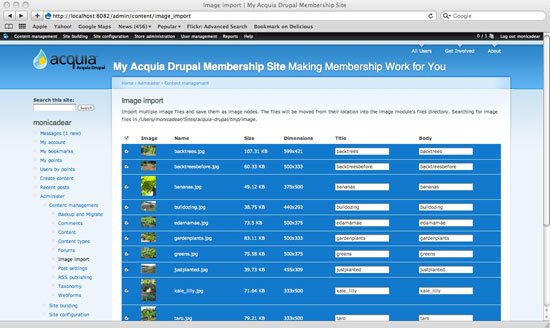
Next, take those images from the temp folder and import them to your Drupal website:
Admin > Content Management > Image Import
Direct URL:
http://example.com/admin/content/image_import
You can use the Select button at the very top of the list to auto-select all of the images.
At this point, specify a new "Title" and "Body."
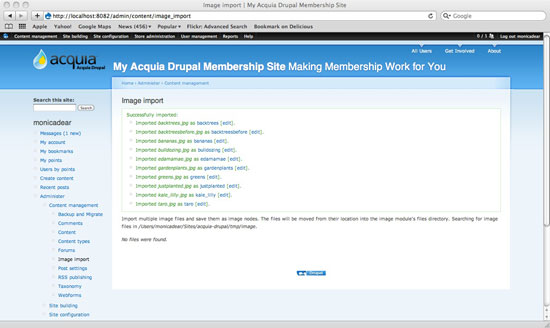
After the images have been imported, you’ll receive a confirmation.
You can always refer to the content overview section by going to:
Admin > Content management > Content > List
Direct URL:
http://example.com/admin/content/node/overview
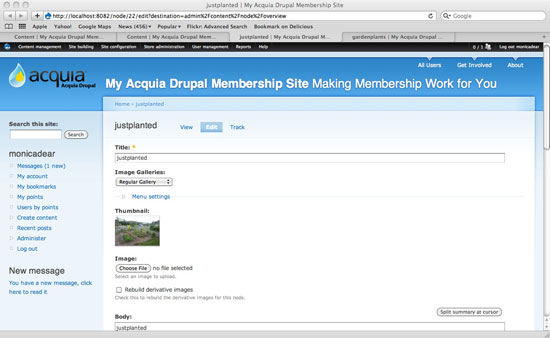
Review which of the most recent items have been moved over, and make sure that any new images are assigned to the correct gallery. For example, I am assigning this particular image to the "Regular Gallery," which is in the dropdown list right under the title of the image.

Step 3: Fill Out the Informational Pages

Now is your chance to start creating pages about your portfolio website. Typically, you’ll start with pages such as:
  • Home
  • Biography
  • Contact
  • Privacy policy
  • Terms and conditions
You can create new pages using the "Page Management" tool:
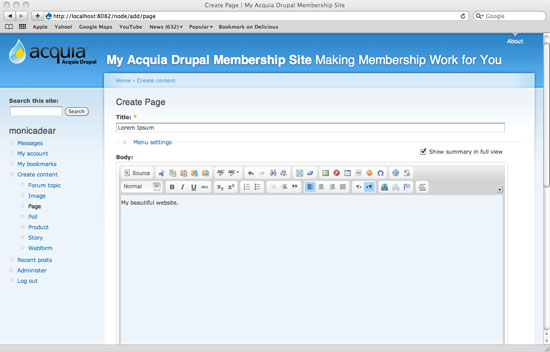
Admin > Content management > Create content > Page
Direct URL:
http://example.com/node/add/page
You can also specify whether or not the page should appear in the "Primary Links" menu, which is usually found across the top of every page.

Step 4: Using Lightbox

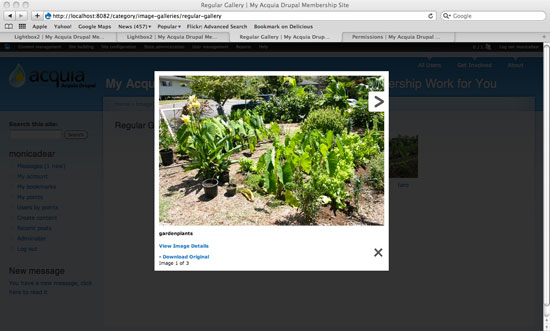
Lightbox 2 is a very nice way to present photos on a website. It allows you to upload images to the Image Gallery; and then, when a user clicks through the images, the images come up as a modal window with an arrow on either side of the image.
It’s worth briefly reviewing the available options for Lightbox. For the gallery we’re working on, we won’t change the default settings much.
To configure Lightbox, go to:
Admin > Site configuration > Light box > General
Direct URL:
http://example.com/admin/settings/lightbox2/general
My only change to the default settings is the following:
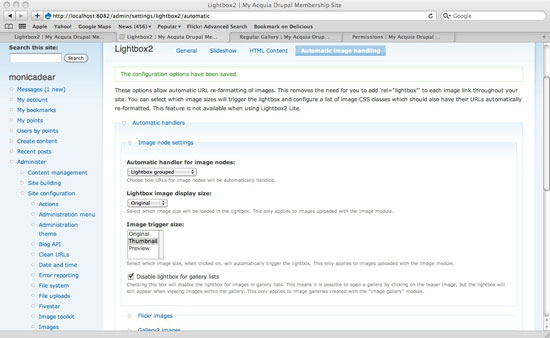
 Admin > Site configuration > Lightbox > Automatic image handling
Direct URL:
http://example.com/admin/settings/lightbox2/automatic
Set the Automatic handler for image nodes option to be Lightbox grouped. This means that the images will be grouped together but appear one at a time, with "Next" and "Previous" arrows and a dark shadow behind them.

Putting It All Together

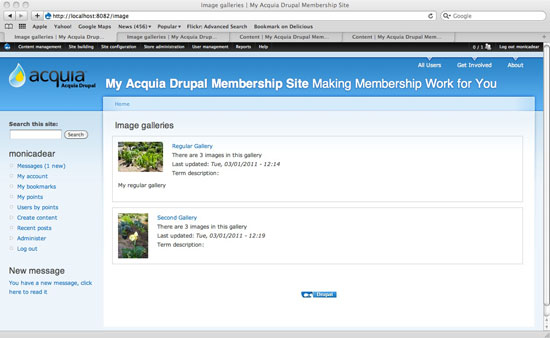
If you’re using the Image Gallery’s default functionality, then all of your galleries will appear at:
http://example.com/image
Finally, the uploaded images themselves will appear in Lightbox format if you click on one of the thumbnails in a gallery.

Bonus: Using Ubercart to Handle Payments

I use Ubercart to handle user payments. This software is free and open source, and it allows you to sell products on your website. The products could be digital, such as high-resolution JPEGs (like screensavers) or PDF reports that are unlocked upon payment. Or they could be physical, such as signed prints, t-shirts, mugs, calendars or signed photos, which require shipment to the buyer.
Perhaps the site owner wants to sell subscriptions to the website, in which case the product would be a "membership package" that directs the purchaser to a "paid members" section for a fixed amount of time.
You can create a product by going to:
Admin > Content management > Create content > Product
Direct URL:
http://example.com/node/add/product
If you use Ubercart, you’ll need a payment gateway such as PayPal or Authorize.net to accept payments. If you choose to accept payments directly on your website, you’ll also need to purchase an SSL certificate to make data transmission from user to your web server (and back) more secure.

Examples

Would you like to see some examples of this deployment in action? Check out the following examples:

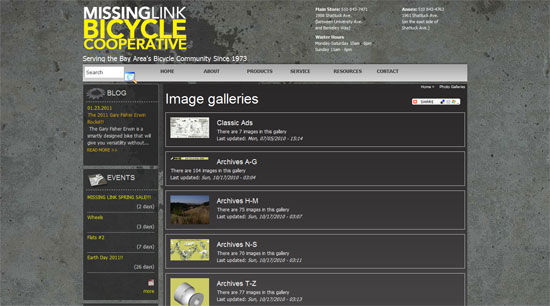
Missing Link

Images of logos, products and events for a bicycle co-op.
Missing Link

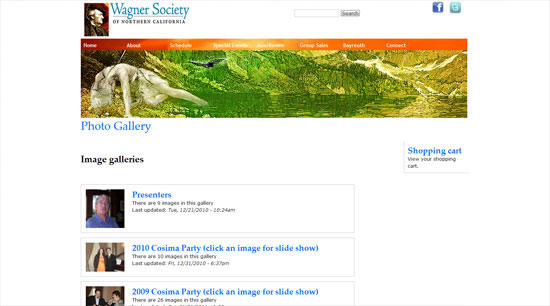
Wagner Society of Northern California

Images of members of an organization devoted to the famous composer.
Wagner Society of Northern California