Pages

Friday, November 6, 2015

Custom Display Suite Fields in Drupal 8

Without question, Display Suite is one of the most popular modules in Drupal’s contributed modules history. It allows the creation of layouts, fields and exposes all sorts of other powerful tools we use to build the presentation layer of our Drupal sites.
Drupal 8 logo
One of the more powerful features of Display Suite (DS) is the ability to create custom fields that can be displayed inside DS layouts alongside the actual core field values. In Drupal 7, this has been a very popular way of building layouts and showing dynamic data that is not strictly related to the output of any Field API field on the node (or other) entity.
Display Suite has been ported and is being maintained for Drupal 8. Depending on another contributed module called Layout Plugin, the D8 version offers much of what we have available in Drupal 7 and probably even more.
In this article, we are going to look at how we can create our own Display Suite field in Drupal 8 using the new OOP architecture and plugin system. To demonstrate this, we are going to create a DS field available only on the Article nodes that can be used to display a list of taxonomy terms from a certain vocabulary. And we’re going to make it so that the latter can be configured from the UI, namely admins will be able to specify which vocabulary’s terms should be listed. Not much usefulness in this example, I know, but it will allow you to understand how things work.
If you are following along, the code we write is available in this repository inside the Demo module. So feel free to check that out.

Drupal 8 plugins

Much of the functionality that used to be declared using an _info hook in Drupal 7 is now declared using plugins in Drupal 8. For more information on using plugins and creating your own plugin types, make sure you check out a previous Sitepoint article that talks about just that.
Display Suite also uses the new plugin system to allow other modules to define DS fields. It exposes a DsField plugin type which allows us to write and maintain all the necessary logic for such a field inside a single plugin class (+ any services we might inject into it). So we no longer implement hook_ds_field_info() and return an array of field information per entity type, but create a plugin class with data straight in its annotation and the relevant logic inside its methods.

VocabularyTerms class

Let us start by creating our plugin class called VocabularyTerms inside the src/plugins/DsField folder of our custom module and annotating it for our purposes:
namespace Drupal\demo\Plugin\DsField;

use Drupal\ds\Plugin\DsField\DsFieldBase;

/**
 * Plugin that renders the terms from a chosen taxonomy vocabulary.
 *
 * @DsField(
 *   id = "vocabulary_terms",
 *   title = @Translation("Vocabulary Terms"),
 *   entity_type = "node",
 *   provider = "demo",
 *   ui_limit = {"article|*"}
 * )
 */
class VocabularyTerms extends DsFieldBase {
}
This class alone will hold all of our logic for our very simple DsField plugin. But here are a couple of remarks about what we have so far:
  • The annotation is quite self explanatory: it provides meta information about the plugin.
  • The class extends DsFieldBase which provides base functionality for all the plugins of this type.
  • At the time of writing, the ui_limit annotation has just been committed to HEAD so it might not be available in the release you are using. Limiting the availability of the field on content types and view modes can be done by overriding the isAllowed() method of the base class and performing the logic there.

Default configuration

We want our field to be configurable: the ability to select from a list of existing vocabularies. So let’s start off by providing some defaults to this configuration so that if the user selects nothing, the Tags vocabulary which comes with core will be used. For this, we have to implement the defaultConfiguration() method:
/**
 * {@inheritdoc}
 */
public function defaultConfiguration() {

  $configuration = array(
    'vocabulary' => 'tags',
  );

  return $configuration;
}
And since we only have one configuration option, we return an array with one element keyed by the configuration name. That’s about it.

Formatters

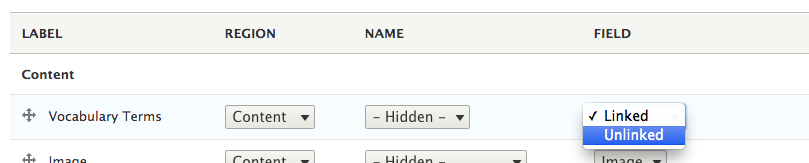
We also want to have the ability to specify from the UI if the list of taxonomy terms is a series of links to their term pages or formatter as plain text. We could implement this within the configuration realm but let’s do so using formatters instead. And it’s very simple: we implement the formatters() method and return an array of available formatters:
/**
 * {@inheritdoc}
 */
public function formatters() {
  return array('linked' => 'Linked', 'unlinked' => 'Unlinked');
}
DS Field Formatter Options
These will be available for selection in the UI under the Field heading of the Manage Display page of the content type. And we’ll be able to see the choice when we are building the actual field for display. But more on that in a second.

Configuration summary

It’s also recommended that if we are using UI defined settings, we have a summary of what has been selected as a simple string that describes it. This gets printed under the Widget heading of the Manage Display page of the content type.
DS Configuration Summary
To do this, we need to implement the settingsSummary() method and return said text:
/**
 * {@inheritdoc}
 */
public function settingsSummary($settings) {
  $config = $this->getConfiguration();
  $no_selection = array('No vocabulary selected.');

  if (isset($config['vocabulary']) && $config['vocabulary']) {
    $vocabulary = Vocabulary::load($config['vocabulary']);
    return $vocabulary ? array('Vocabulary: ' . $vocabulary->label()) : $no_selection;
  }

  return $no_selection;
}
Here we start getting more intimate with the actual configuration that was stored with the field, available by calling the getConfiguration() method on our plugin class. What we do above, then, is check if the vocabulary setting has been set, we load it based on its machine name using the Vocabulary class and return an array of strings that need to be printed.
Since we are referencing the Vocabulary class, we also need to use it at the top:
use Drupal\taxonomy\Entity\Vocabulary;
Important to note: I am using Vocabulary statically here to load an entity for the sake of brevity. It is highly recommended you inject the relevant storage using dependency injection and use that to load entities. The same goes for most classes you’ll see me referencing statically below.

Settings form

Now that we display which configuration has been chosen from the UI, it’s time to provide the actual form which will allow the user to do so. This will be made available by clicking the cogwheel under the Operations heading of the Manage Display page of the content type.
DS Field Settings Form
/**
 * {@inheritdoc}
 */
public function settingsForm($form, FormStateInterface $form_state) {
  $config = $this->getConfiguration();

  $names = taxonomy_vocabulary_get_names();
  $vocabularies = Vocabulary::loadMultiple($names); 
  $options = array();
  foreach ($vocabularies as $vocabulary) {
    $options[$vocabulary->id()] = $vocabulary->label();
  }
  $settings['vocabulary'] = array(
    '#type' => 'select',
    '#title' => t('Vocabulary'),
    '#default_value' => $config['vocabulary'],
    '#options' => $options,
  );

  return $settings;
}
Like before, we need to implement a method for this. And what we do inside is load all the taxonomy vocabulary names and prepare an array of options to be used with a Form API select list. The latter is the only element we need for this form.

Rendering the field

The last thing left to do is implement the build() method responsible for rendering the contents of our field:
/**
 * {@inheritdoc}
 */
public function build() {
  $config = $this->getConfiguration();
  if (!isset($config['vocabulary']) || !$config['vocabulary']) {
    return;
  }

  $query = \Drupal::entityQuery('taxonomy_term')
    ->condition('vid', $config['vocabulary']);

  $tids = $query->execute();
  if (!$tids) {
    return;
  }

  $terms = Term::loadMultiple($tids);
  if (!$terms) {
    return;
   }

  return array(
    '#theme' => 'item_list',
    '#items' => $this->buildTermList($terms),
  );
}
So what do we do here? First, we access the chosen vocabulary from the configuration. Then we run an EntityQuery to find all the terms in this vocabulary. Next, we load all these terms and finally we return a render array that uses the item_list theme to print our terms.
Although we don’t need it here, in most cases you’ll need to access the node entity that is currently being rendered. That is available inside the configuration array under the entity key. Moreover, under the build key you have the actual render array of the node being built. So keep this in mind and do inspect the other elements of the configuration array on your own for more information.
I would like to mention a few more things before we take a look at the actual buildTermList() method. First, for brevity, we used the EntityQuery service statically. In your project, you should inject it. Second, we used the Term class statically to load the taxonomy term entities. Again, you should inject its storage and use that for this purpose. And lastly, we should import the Term class at the top with use:
use Drupal\taxonomy\Entity\Term;
Now that this is clear, let’s take a look at our own buildTermList() method:
private function buildTermList(array $terms) {
  $config = $this->getConfiguration();
  $formatter = isset($config['field']['formatter']) && $config['field']['formatter'] ? $config['field']['formatter'] : 'unlinked';
  $items = array();
  foreach ($terms as $term) {
    $items[] = $this->buildTermListItem($term, $formatter);
  }

  return $items;
}
This method is responsible for getting the field formatter, looping through the term entities and building an array of term information that can be printed using the item_list theme. As you can see, though, the individual term entity and formatter are passed to yet another helper method to keep things nice and tidy:
private function buildTermListItem(Term $term, $formatter) {
  if ($formatter === 'linked') {
    $link_url = Url::fromRoute('entity.taxonomy_term.canonical', array('taxonomy_term' => $term->id()));
    return \Drupal::l($term->label(), $link_url);
  }

  return SafeMarkup::checkPlain($term->label());
}
Finally, in the buildTermListItem() method we either return the sanitized title of the term or a link to it depending on the formatter.
Again we see classes which should be injected but were used statically to save some space. With the risk of sounding like a broken record, keep in mind that you should inject these. For now, we must use them at the top:
use Drupal\Core\Url;
use Drupal\Component\Utility\SafeMarkup;

PHP vs Node.js

The web is ever-changing technology landscape. Server-side developers have a bewildering choice of long-standing heavy-weights such as Java, C, and Perl to newer, web-focused languages such as Ruby, Clojure and Go. It rarely matters what you choose, presuming your application works.
But how do those new to web development make an informed choice?
I hope not to start a holy war, but I’m pitting two development disciplines against each other:
  • PHP
    PHP was created by Rasmus Lerdorf in 1994. It is processed by an interpreter normally installed as a module in a web server such as Apache or Nginx. PHP code can be intermingled with HTML. That’s not necessarily best-practice, but those new to the language can produce useful code very quickly. It contributed to the language’s popularity, and PHP is now used on more than 80% of the world’s web servers. It has been helped in no small part by WordPress — a PHP Content Management System which powers a quarter of all sites.
  • Node.js
    Node.js was created by Ryan Dahl in 2009. It uses Google’s V8 JavaScript engine, which also powers client-side code in the Chrome web browser. Unusually, the platform has built-in libraries to handle web requests and responses — you don’t need a separate web server or other dependencies. Node.js is relatively new but has been rapidly gaining traction. It’s used by companies including Microsoft, Yahoo, LinkedIn and PayPal.

Where’s C#, Java, Ruby, Python, Perl, Erlang, C++, Go, Dart, Scala, Haskell, etc?

An article which compared every option would be long. Would you read it? Do you expect a single developer to know them all? I’ve restricted this smackdown to PHP and Node.js because:
  1. It’s a good comparison. They’re both open source, primarily aimed at web development and applicable to similar projects.
  2. PHP is a long-established language but Node.js is a young upstart receiving increased attention. Should PHP developers believe the Node.js hype? Should they consider switching?
  3. I know and love the languages. I’ve been developing with PHP and JavaScript since the late 1990s, with a few years of Node.js experience. I’ve dabbled in other technologies, but couldn’t do them justice in this review.
Besides, it wouldn’t matter how many languages I compared. Someone, somewhere, would complain that I hadn’t included their favorite!

About Smackdowns

Developers spend many years honing their craft. Some have languages thrust upon them, but those who reach Ninja level usually make their own choice based on a host of factors. It’s subjective; you’ll promote and defend your technology decision.
That said, Smackdowns are not “use whatever suits you, buddy” reviews. I will make recommendations based on my own experience, requirements and biases. You’ll agree with some points and disagree with others; that’s great — your comments will help others make an informed choice.

Evaluation Methodology

PHP and Node.js are compared in the following ten rounds. Each bout considers a general development challenge which could be applied to any web technology. We won’t go too deep; few people will care about the relative merits of random number generators or array sorting algorithms.
The overall winner will be the technology which wins the most rounds. Ready? Let the battle commence …

Round 1: Getting Started

How quickly can you build a “Hello World” web page? In PHP:
<?php
 echo 'Hello World!';
?>
The code can be placed in any file which is interpreted by the PHP engine — typically, one with a .php extension. Enter the URL which maps to that file in your browser and you’re done.
Admittedly, this isn’t the whole story. The code will only run via a web server with PHP installed. (PHP has a built-in server, although it’s best to use something more robust). Most OSs provide server software such as IIS on Windows or Apache on Mac and Linux, although they need to be enabled and configured. It’s often simpler to use a pre-built set-up such as XAMPP or a virtual OS image (such as Vagrant). Even easier: upload your file to almost any web host.
By comparison, installing Node.js is a breeze. You can either download the installer or use a package manager. So let’s create our web page in hello.js:
var http = require('http');
http.createServer(function (req, res) {
 res.writeHead(200, {'Content-Type': 'text/plain'});
 res.end('Hello World!');
}).listen(3000, '127.0.0.1');
You need to start the app from the terminal with node hello.js before you can visit http://127.0.0.1:3000/ in your browser. We’ve created a small web server in five lines of code and, amazing though that is, even those with strong client-side JavaScript experience would struggle to understand it.
PHP is conceptually simpler and wins this round. Those who know a few PHP statements can write something useful. It has more software dependencies, but PHP concepts are less daunting to new developers.
There’s a greater intellectual leap between knowing some JavaScript and coding Node.js apps. The development approach is different from most server-side technologies, and you need to understand fairly complex concepts such as closures and callback functions.

Round 2: Help and Support

You won’t get far without some development assistance from the official documentation and resources such as courses, forums and StackOverflow. PHP wins this round easily; it has a great manual and twenty years’ worth of Q&As. Whatever you’re doing, someone will have encountered a similar issue before.
Node.js has good documentation but is younger and there is less help available. JavaScript has been around as long as PHP, but the majority of assistance relates to in-browser development. That rarely helps.

Round 3: Language Syntax

Are statements and structures logical and easy to use?
Unlike some languages and frameworks, PHP doesn’t force you to work in a specific way and grows with you. You can start with a few multi-line programs, add functions, progress to simple PHP4-like objects and eventually code beautiful object-oriented MVC PHP5+ applications. Your code may be chaotic to start with, but it’ll work and evolve with your understanding.
PHP syntax can change between versions, but backward compatibility is generally good. Unfortunately, this has led to a problem: PHP is a mess. For example, how do you count the number of characters in a string? Is it count? str_len? strlen? mb_strlen? There are hundreds of functions and they can be inconsistently named. Try writing a few lines of code without consulting the manual.
JavaScript is comparatively concise, with a few dozen core statements. That said, the syntax attracts venom from developers because its prototypal object model seems familiar but isn’t. You’ll also find complaints about mathematical errors (0.1 + 0.2 != 0.3) and type conversion confusion ('4' + 2 == '42' and '4' - 2 == 2) — but these situations rarely cause problems, and all languages have quirks.
PHP has benefits, but I’m awarding round three to Node.js. The reasons include:
  1. JavaScript remains the world’s most misunderstood language — but, once the concepts click, it makes other languages seem cumbersome.
  2. JavaScript code is terse compared to PHP. For example, you’ll no longer need to translate to/from JSON and — thankfully — UTF-8.
  3. Full-stack developers can use JavaScript on the client and server. Your brain doesn’t need to switch modes.
  4. Understanding JavaScript makes you want to use it more. I couldn’t say the same for PHP.

Round 4: Development Tools

Both technologies have a good range of editors, IDEs, debuggers, validators and other tools. I considered calling a draw but there’s one tool which gives Node.js an edge: npm — the Node Package Manager. npm allows you to install and manage dependencies, set configuration variables, define scripts and more.
PHP’s Composer project was influenced by npm and is better in some respects. However, it’s not provided with PHP by default, has a smaller active repository and has made less of an impact within the community.
npm is partially responsible for the growth of build tools such as Grunt and Gulp which have revolutionized development. PHP developers will probably want/need to install Node.js at some point. The reverse isn’t true.

Round 5: Environments

Where can the technologies be used and deployed? Which platforms and ecosystems are supported? Web developers often need to create applications which aren’t strictly for the web, e.g. build tools, migration tools, database conversion scripts, etc.
There are ways to use PHP for desktop and command-line app development. You won’t use them. At heart, PHP is a server-side development technology. It’s good at that job but is rarely stretched beyond those boundaries.
A few years ago, JavaScript would have been considered more restrictive. There were a few fringe technologies but its main place was in the browser. Node.js has changed that perception and there has been an explosion of JavaScript projects. You can use JavaScript everywhere — in the browser, on the server, terminal, desktop and even embedded systems. Node.js has made JavaScript ubiquitous.

Round 6: Integration

Development technologies are restricted unless they can integrate with databases and drivers. PHP is strong in this area. It’s been around for many years and its extensions system allow direct communication with a host of popular and obscure APIs.
Node.js is catching up fast, but you may struggle to find mature integration components for older, less-popular technologies.

Round 7: Hosting and Deployment

How easy is deploying your shiny new app to a live web server? It’s another clear win for PHP. Contact a random selection of web hosting companies and you’ll discover the majority offer PHP support. You’ll probably get MySQL thrown in for a bargain price. PHP is considerably easier to sandbox and more risky extensions can be disabled.
Node.js is a different beast and server-side apps run permanently. You’ll need a real/virtual/cloud or specialist server environment, ideally with root SSH access. That’s a step too far for some hosts, especially on shared hosting where you could bring down the whole system.
Node.js hosting will become simpler, but I doubt it’ll ever match the ease of FTP’ing a few PHP files.

Round 8: Performance

PHP is no slouch and there are projects and options which make it faster. Even the most demanding PHP developer rarely worries about speed but Node.js performance is generally better. Of course, performance is largely a consequence of the experience and care taken by the development team but Node.js has several advantages…

Fewer Dependencies

All requests to a PHP application must be routed via a web server which starts the PHP interpreter which runs the code. Node.js doesn’t need so many dependencies and, while you’ll almost certainly use a server framework such as Express, it’s lightweight and forms part of your application.

A Smaller, Faster Interpreter

Node.js is smaller and nimbler than the PHP interpreter. It’s less encumbered by legacy language support and Google has made a huge investment in V8 performance.

Applications are Permanently On

PHP follows the typical client-server model. Every page request initiates your application; you load configuration parameters, connect to a database, fetch information and render HTML. A Node.js app runs permanently and it need only initialize once. For example, you could create a single database connection object which is reused by everyone during every request. Admittedly, there are ways to implement this type of behavior in PHP using systems such as Memcached but it’s not a standard feature of the language.

An Event-driven, Non-Blocking I/O

PHP and most other server-side languages use an obvious blocking execution model. When you issue a command such as fetching information from a database, that command will complete execution before progressing to the next statement. Node.js doesn’t (normally) wait. Instead, you provide a callback function which is executed once the action is complete, e.g.
// fetch records from a NoSQL database
DB.collection('test').find({}).toArray(process);
console.log('finished');

// process database information
function process(err, recs) {
 if (!err) {
  console.log(recs.length + ' records returned');
 }
}
In this example, the console will output ‘finished’ before ‘N records returned’ because the process function is called when all the data has been retrieved. In other words, the interpreter is freed to do other work while other processes are busy.
Note that situations are complex and there are caveats:
  • Node.js/JavaScript runs on a single thread while most web servers are multi-threaded and handle requests concurrently.
  • Long-running JavaScript processes for one user prevent code running for all other users unless you split tasks or use Web Workers.
  • Benchmarking is subjective and flawed; you’ll find examples where Node.js beats PHP and counter examples where PHP beats Node.js. Developers are adept at proving whatever they believe!
  • Writing asynchronous event-driven code is complex and incurs its own challenges.
I can only go from experience: my Node.js applications are noticeably faster than PHP equivalents. Yours may not be but you’ll never know until you try.

Round 9: Programmer Passion

This may be stretching the “general web development challenge” objective but it’s important. It doesn’t matter whether a technology is good or bad if you dread writing code every day.
It’s a little difficult to make comparisons but relatively few PHP developers are passionate about the language. When was the last time you read a PHP article or saw a presentation which captivated the audience? Perhaps everything has been said? Perhaps there’s less exposure? Perhaps I’m not looking in the right places? There are some nice features arriving in PHP7 but the technology has been treading water for a few years. That said, few PHP developers berate the language.
JavaScript splits the community. There are those who love it and those who hate it; few developers sit on the fence. However, response to Node.js has been largely positive and the technology is riding the crest of a wave. This is partly because it’s new and the praise may not last but, for now, Node.js wins this round.

Round 10: The Future

It doesn’t particularly matter which server-side language you use; it will continue to work even if the project is abandoned (yay ColdFusion!) Usage has possibly plateaued but many continue to use PHP. It’s a safe bet and support looks assured for another twenty years.
The ascent of Node.js has been rapid. It offers a modern development approach, uses the same syntax as client-side development and supports revolutionary HTML5 features such as web sockets and server-sent events. There has been some confusion regarding forks of the language but usage continues to grow at an exponential rate.
Node.js will inevitably eat into PHP’s market share but I doubt it will overtake. Both technologies have a bright future. I declare this round a draw.

The Overall Winner

The final score: five rounds to Node.js, four to PHP and one draw. The result was closer than I expected and could have gone either way.
Node.js has a steep learning curve and isn’t ideal for novice developers but it wins this smackdown. Just. If you’re a competent JavaScript programmer who loves the language, Node.js doesn’t disappoint. It feels fresher and offers a liberating web development experience — you won’t miss PHP.
But don’t discount it. PHP is alive and there’s little reason to jump on the Node.js bandwagon because it looks faster, newer or trendier. PHP is easier to learn yet supports proficient professional programming techniques. Assistance is everywhere and deployment is simple. Even die-hard Node.js developers should consider PHP for simpler websites and apps.
My advice: assess the options and and pick a language based on your requirements. That’s far more practical than relying on ‘vs’ articles like this!

How to Build Multi-step Forms in Drupal 8

In this article, we are going to look at building a multistep form in Drupal 8. For brevity, the form will have only two steps in the shape of two completely separate forms. To persist values across these steps, we will use functionality provided by Drupal’s core for storing temporary and private data across multiple requests.


In Drupal 7, a similar approach can be achieved using the cTools object cache. Alternatively, there is the option of persisting data through the $form_state array as illustrated in this tutorial.
The code we write in this article can be found in this repository alongside much of the Drupal 8 work we’ve been doing so far. We will be dealing with forms quite a lot so I do recommend checking out one of the previous articles on Drupal 8 in which we talk about forms.

The plan

As I mentioned above, our multistep form will consist of two independent forms with two simple elements each. Users will be able to fill in the first one and move to the second form where they can either go back to the previous step or fill it in and press submit. While navigating between the different steps, the previously submitted values are stored and used to pre-populate the form fields. If the last form is submitted, however, the data gets processed (not covered in this article) and cleared from the temporary storage.
Technically, both of these forms will inherit common functionality from an abstract form class we will call MultistepFormBase. This class will be in charge of injecting the necessary dependencies, scaffolding the form, processing the end result and anything else that is needed and is common to both.
We will group all the form classes together and place them inside a new folder called Multistep located within the Form plugin directory of our demo module (next to the old DemoForm). This is purely for having a clean structure and being able to quickly tell which forms are part of our multistep form process.

The code

We will start with the form base class. I will explain what is going on here after we see the code.
MultistepFormBase.php:
/**
 * @file
 * Contains \Drupal\demo\Form\Multistep\MultistepFormBase.
 */

namespace Drupal\demo\Form\Multistep;

use Drupal\Core\Form\FormBase;
use Drupal\Core\Form\FormStateInterface;
use Drupal\Core\Session\AccountInterface;
use Drupal\Core\Session\SessionManagerInterface;
use Drupal\user\PrivateTempStoreFactory;
use Symfony\Component\DependencyInjection\ContainerInterface;

abstract class MultistepFormBase extends FormBase {

  /**
   * @var \Drupal\user\PrivateTempStoreFactory
   */
  protected $tempStoreFactory;

  /**
   * @var \Drupal\Core\Session\SessionManagerInterface
   */
  private $sessionManager;

  /**
   * @var \Drupal\Core\Session\AccountInterface
   */
  private $currentUser;

  /**
   * @var \Drupal\user\PrivateTempStore
   */
  protected $store;

  /**
   * Constructs a \Drupal\demo\Form\Multistep\MultistepFormBase.
   *
   * @param \Drupal\user\PrivateTempStoreFactory $temp_store_factory
   * @param \Drupal\Core\Session\SessionManagerInterface $session_manager
   * @param \Drupal\Core\Session\AccountInterface $current_user
   */
  public function __construct(PrivateTempStoreFactory $temp_store_factory, SessionManagerInterface $session_manager, AccountInterface $current_user) {
    $this->tempStoreFactory = $temp_store_factory;
    $this->sessionManager = $session_manager;
    $this->currentUser = $current_user;

    $this->store = $this->tempStoreFactory->get('multistep_data');
  }

  /**
   * {@inheritdoc}
   */
  public static function create(ContainerInterface $container) {
    return new static(
      $container->get('user.private_tempstore'),
      $container->get('session_manager'),
      $container->get('current_user')
    );
  }

  /**
   * {@inheritdoc}.
   */
  public function buildForm(array $form, FormStateInterface $form_state) {
    // Start a manual session for anonymous users.
    if ($this->currentUser->isAnonymous() && !isset($_SESSION['multistep_form_holds_session'])) {
      $_SESSION['multistep_form_holds_session'] = true;
      $this->sessionManager->start();
    }

    $form = array();
    $form['actions']['#type'] = 'actions';
    $form['actions']['submit'] = array(
      '#type' => 'submit',
      '#value' => $this->t('Submit'),
      '#button_type' => 'primary',
      '#weight' => 10,
    );

    return $form;
  }

  /**
   * Saves the data from the multistep form.
   */
  protected function saveData() {
    // Logic for saving data goes here...
    $this->deleteStore();
    drupal_set_message($this->t('The form has been saved.'));

  }

  /**
   * Helper method that removes all the keys from the store collection used for
   * the multistep form.
   */
  protected function deleteStore() {
    $keys = ['name', 'email', 'age', 'location'];
    foreach ($keys as $key) {
      $this->store->delete($key);
    }
  }
}
Our abstract form class extends from the default Drupal FormBase class so that we can use some of the functionality made available by it and the traits it uses. We are using dependency injection to inject some of the needed services:
  • PrivateTempStoreFactory gives us a temporary store that is private to the current user (PrivateTempStore). We will keep all the submitted data from the form steps in this store. In the constructor, we are also immediately saving the store attribute which contains a reference to the multistep_data key/value collection we will use for this process. The get() method on the factory either creates the store if it doesn’t exist or retrieves it from the storage.
  • The SessionManager allows us to start a session for anonymous users.
  • The CurrentUser allows us to check if the current user is anonymous.
Inside the buildForm() method we do two main things. First, we start a session for anonymous users if one does’t already exist. This is because without a session we cannot pass around temporary data across multiple requests. We use the session manager for this. Second, we create a base submit action button that will be present on all the implementing forms.
The saveData() method is going to be called from one or more of the implementing forms and is responsible with persisting the data from the temporary storage once the multistep process is completed. We won’t be going into the details of this implementation because it depends entirely on your use case (e.g. you can create a configuration entity from each submission). We do, however, handle the removal of all the items in the store once the data has been persisted. Keep in mind though that these types of logic checks should not be performed in the base class. You should defer to a dedicated service class as usual, or use a similar approach.
Now it’s time for the actual forms that will represent steps in the process. We start with the first class inside a file called MultistepOneForm.php:
/**
 * @file
 * Contains \Drupal\demo\Form\Multistep\MultistepOneForm.
 */

namespace Drupal\demo\Form\Multistep;

use Drupal\Core\Form\FormStateInterface;

class MultistepOneForm extends MultistepFormBase {

  /**
   * {@inheritdoc}.
   */
  public function getFormId() {
    return 'multistep_form_one';
  }

  /**
   * {@inheritdoc}.
   */
  public function buildForm(array $form, FormStateInterface $form_state) {

    $form = parent::buildForm($form, $form_state);

    $form['name'] = array(
      '#type' => 'textfield',
      '#title' => $this->t('Your name'),
      '#default_value' => $this->store->get('name') ? $this->store->get('name') : '',
    );

    $form['email'] = array(
      '#type' => 'email',
      '#title' => $this->t('Your email address'),
      '#default_value' => $this->store->get('email') ? $this->store->get('email') : '',
    );

    $form['actions']['submit']['#value'] = $this->t('Next');
    return $form;
  }

  /**
   * {@inheritdoc}
   */
  public function submitForm(array &$form, FormStateInterface $form_state) {
    $this->store->set('email', $form_state->getValue('email'));
    $this->store->set('name', $form_state->getValue('name'));
    $form_state->setRedirect('demo.multistep_two');
  }
}
This form will look something like this:
Drupal 8 Multistep Forms 1
In the buildForm() method we are defining our two dummy form elements. Do notice that we are retrieving the existing form definition from the parent class first. The default values for these fields are set as the values found in the store for those keys (so that users can see the values they filled in at this step if they come back to it). Finally, we are changing the value of the action button to Next (to indicate that this form is not the final one).
In the submitForm() method we save the submitted values to the store and then redirect to the second form (which can be found at the route demo.multistep_two). Keep in mind that we are not doing any sort of validation here to keep the code light. But most use cases will call for some input validation.
Since we’ve touched upon the issue of routes, let’s update the route file in our demo module and create two new routes for our forms:
demo.routing.yml:
demo.multistep_one:
  path: '/demo/multistep-one'
  defaults:
    _form: '\Drupal\demo\Form\Multistep\MultistepOneForm'
    _title: 'First form'
  requirements:
    _permission: 'access content'
demo.multistep_two:
  path: '/demo/multistep-two'
  defaults:
    _form: '\Drupal\demo\Form\Multistep\MultistepTwoForm'
    _title: 'Second form'
  requirements:
    _permission: 'access content'
For more information about what is going on in this file you can read one of the previous Drupal 8 articles which explain routes as well.
Finally, we can create our second form (inside a file called MultistepTwoForm):
/**
 * @file
 * Contains \Drupal\demo\Form\Multistep\MultistepTwoForm.
 */

namespace Drupal\demo\Form\Multistep;

use Drupal\Core\Form\FormStateInterface;
use Drupal\Core\Url;

class MultistepTwoForm extends MultistepFormBase {

  /**
   * {@inheritdoc}.
   */
  public function getFormId() {
    return 'multistep_form_two';
  }

  /**
   * {@inheritdoc}.
   */
  public function buildForm(array $form, FormStateInterface $form_state) {

    $form = parent::buildForm($form, $form_state);

    $form['age'] = array(
      '#type' => 'textfield',
      '#title' => $this->t('Your age'),
      '#default_value' => $this->store->get('age') ? $this->store->get('age') : '',
    );

    $form['location'] = array(
      '#type' => 'textfield',
      '#title' => $this->t('Your location'),
      '#default_value' => $this->store->get('location') ? $this->store->get('location') : '',
    );

    $form['actions']['previous'] = array(
      '#type' => 'link',
      '#title' => $this->t('Previous'),
      '#attributes' => array(
        'class' => array('button'),
      ),
      '#weight' => 0,
      '#url' => Url::fromRoute('demo.multistep_one'),
    );

    return $form;
  }

  /**
   * {@inheritdoc}
   */
  public function submitForm(array &$form, FormStateInterface $form_state) {
    $this->store->set('age', $form_state->getValue('age'));
    $this->store->set('location', $form_state->getValue('location'));

    // Save the data
    parent::saveData();
    $form_state->setRedirect('some_route');
  }
}
This one will look like this, again very simple:
Drupal 8 Multistep Forms 1
Again, we are extending from our base class like we did with the first form. This time, however, we have different form elements and we are adding a new action link next to the submit button. This will allow users to navigate back to the first step of the form process.
Inside the submitForm() method we again save the values to the store and defer to the parent class to persist this data in any way it sees fit. We then redirect to whatever page we want (the route we use here is a dummy one).
And that is pretty much it. We should now have a working multistep form that uses the PrivateTempStore to keep data available across multiple requests. If we need more steps, all we have to do is create some more forms, add them in between the existing ones and make a couple of adjustments. Of course you can make this much more flexible by not hardcoding the route names in the links and redirects, but I leave that part up to you.

Conclusion

In this article, we looked at a simple way to create a multistep form in Drupal 8. You can, of course, build on this approach and create highly complex and dynamic processes that involve not just forms but also other kinds of steps that leverage cross-request data. Thus, the purpose of this article has been as much about multistep forms as it has been about illustrating the power of the PrivateTempStore. And if you, like me, think that the cTools object cache is very powerful in Drupal 7, you’ll be very invested in its Drupal 8 counterpart.

How to embed a latest article view in your newsletter

  1. Create some article nodes
  2. Install views and create a view called latest_articles
  3. Activate the core module PHP filter
  4. Goto admin/newsletters/templates/mail and edit the default template (or create a new one)
  5. Choose "PHP code" as Text format and paste the following code in your template:
    <?php
    $view = views_get_view('latest_articles');
    $view->set_display('default');
    print $view->preview();
    ?>
  6. Done: goto admin/newsletters/create-send/new and send your newsletter