Mapping address data in Drupal can be confusing, if only because of the
great number of contributed modules available that involve online maps.
Picking the right module (or combination of modules) is challenging -
especially for site builders who are new to mapping in Drupal. In this
tutorial, we'll utilize the popular and well-supported
Geofield module as one of the key ingredients in the common task of entering address data and having it displayed on an interactive map.
This tutorial contains step-by-step instructions for accomplishing
this task, as well as a screencast demonstrating all of the steps.
We'll use the example of adding DrupalCamp address information to a
Drupal 7 site. The site will then automatically display the DrupalCamp
on a map on each camp's page, as well as display all camps on a single
map. Finally, we're going to look at some of the options for using
different map base layers.
This tutorial assumes that you're familiar with Drupal's "big 5"
(content types, taxonomy, menus, users/roles/permissions, and
blocks/regions/themes), the
Views module, as well as downloading, installing, and enabling modules.
Here are the basic steps of what we'll be doing:
- Create a new DrupalCamp content type with a standard (postal) address field.
- Add a (Geofield) field to the DrupalCamp content type to store each address's corresponding latitude and longitude. The Geocoder module will be used to convert the postal address into latitude and longitude values.
- Configure the DrupalCamp content type so that a the latitude and longitude field are displayed as a map.
- Create a view that displays all DrupalCamp nodes' address information on a single map.
- Check out the various options for changing the look of the maps.
Screencast
Create a new "DrupalCamp" Content Type
We're going to use the
Address Field module (which requires the
Chaos tools
module) to allow users to easliy input postal address information for
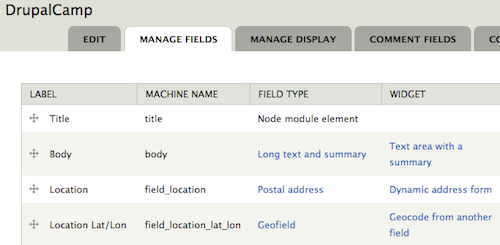
each camp. Once the module is enabled, create a new "DrupalCamp" content
type and add a new field of type "Postal address" (provided by the
Address Field module). Give it a label of "Location", and set its
configuration as follows (anything not listed can be left at default
values):
- Available countries: United States
- Format handlers: Address form (country-specific) and Name
Provide a Field to Store Latitude and Longitude
The
Geofield
module is used to store geographic data in Drupal 7. It can store
points, lines, and polygons, but for this example, we'll just be storing
individual points (locations) - luckily, this is the easiest (and most
common) scenario. The Geofield module also requires the
Chaos tools module as well as the
geoPHP module.
The Geofield module also comes with the Geofield Map module, which we'll be using later in this tutorial.
Before we go ahead and add a new Geofield field type field to our
DrupalCamp content type, we're going to want to go ahead and also enable
the
Geocoder
module. This is because the Geocoder module provides a widget for the
Geofield field type that we're going to use. The Geocoder module also
requires the
Chaos tools and
geoPHP modules.
Now that we have all the required modules enabled, let's go ahead and
add a new field to our DrupalCamp content type. Give it a label of
"Location lat/lon", use a field type of "Geofield", and set its widget
to "Geocode from another field" (this is where the Geocoder module comes
in). Settings for the field are (anything not listed can be left at
default values):
- Geocode from field: Location
- Geocoder: Google Geocoder
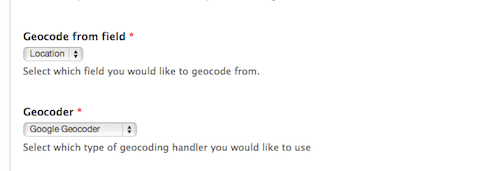
These two field settings are the key for automatically converting
postal address data entered in the "Location" field into
latitude/longitude data stored in the "Location lat/lon" field. The
settings instruct the Geocoder module to grab the postal address data
and send it to the Google Geocoder web service which does the heavy
lifting of converting it to a latitude and longitude. Other geocoding
services are available, but each one provides different capabilities and
different usage limits. For Google Geocoder:
Note: you'll need to have an active internet connection for the Geocoding to work.
Feel free to add other fields to the DrupalCamp content type at
your lesiure, but for this tutorial, this is all that we're going to
need.
Display a Map for Each DrupalCamp Node
At this point, we're ready to add some DrupalCamp nodes.
Find some DrupalCamps to enter - be sure to enter complete location information for each.
You'll notice that as each one is added the "Location lat/lon" field
displays something like "POINT (-90.3288385 38.6491536)". Navigate on
over to the "Manage Display" settings for the DrupalCamp content type
and notice that the formatter for the field is set to "Well Known Text
(WKT)".
According to Wikipedia:
Well Known Text (WKT) is a text markup language for representing
vector geometry objects on a map, spatial reference systems of spatial
objects and transformations between spatial reference systems.
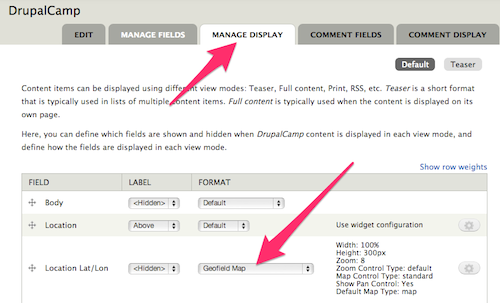
While useful, it doesn't really provide site visitors with what
they're looking for. By enabling the Geofield Map module (which comes
with Geofield), we can now utilize the "Geofield Map" formatter on the
"Location lat/lon" field (via the "Manage Display" page of our
DrupalCamp content type). Select this, then set the formatter's settings
as follows (anything not listed can be left at default values):
Now, go back and take a look at one of your DrupalCamp nodes; instead
of the Well Known Text data, you should see a Google Map with a pin at
the location of the DrupalCamp. Note that this is a fully-enabled Google
Map that you can pan, zoom, and do most anything else you do with any
other Google Map.
Note: you'll need to have an active internet connection for the map to display.
View All DrupalCamps on a Single Map
The ability to view numerous DrupalCamps on a single map is the next logical step. The
Views module
provides the ability to display lists of content. In this case, our
content is DrupalCamp, and instead of a traditional "list", we're going
to output our view as a map.
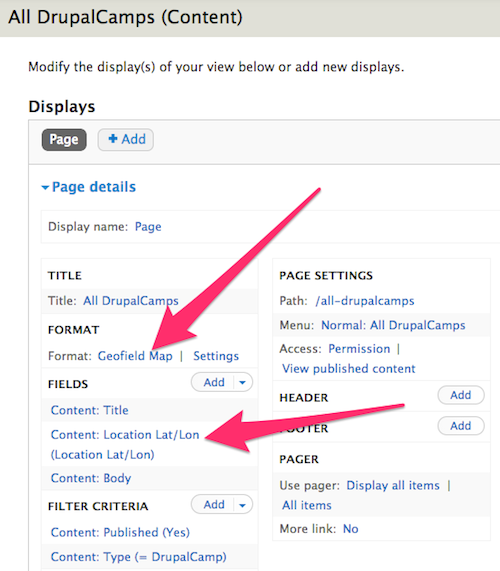
Let's create a new view called "All DrupalCamps". Give it a single
page display with a path of "all-drupalcamps" and filter it by:
- Content: Published = Yes
- Content: Type = DrupalCamp
For fields, we'll keep it simple:
- Content: Title
- Content: Location lat/lon
In the "Content: Location lat/lon" settings, click to "Exclude
it from display" and leave other settings at their default values.
We want to be sure that we display all the DrupalCamp nodes on a single map, so modify the Pager settings as well:
All that is left at this point is to set the Format of the
display. Click on "Unformatted text" in the Format settings, and change
the format to "Geofield Map". For its settings use the following
(anything not listed can be left at default values):
- Data Source: Location lat/lon
- Popup Text: title
The "Data Source" setting tells the Geofield Map formatter where
to look for the latitude and longitude data. In this case, the
Geofield-based "Location lat/lon" field that we included in our list of
fields for this view. The "Popup Text" setting instructs Geofield Map to
use the title field as the text to display when the camp's pin is
clicked.
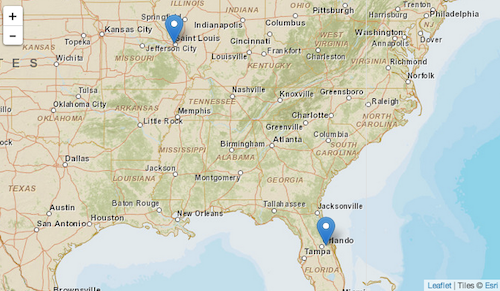
Navigate to the "all-drupalcamps" page on your site and you should
see a Google Map with a pin displayed for each DrupalCamp node on your
site.
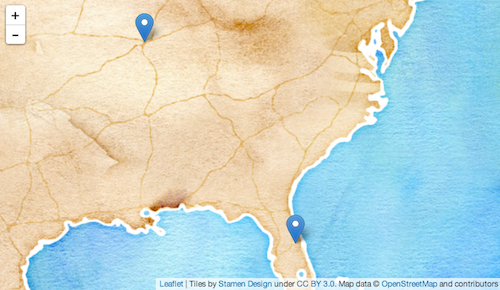
Alternative Map Styles
While the Geofield Map module outputs only Google Maps, the
Leaflet
module provides a number of alternative "base layers" that can give
your map various looks. While the Leaflet module does a lot more than
just provide alternate base layers, we'll only be looking at this
functionality in this tutorial.
The Leaflet module requires the
Libraries module, the
Entity API module, as well as the 3rd-party
Leaflet JS library. Be sure to read the
installation instructions to make sure everything is installed properly.
The Leaflet module comes with several modules. For this tutorial,
we'll need to enable the "Leaflet", "Leaflet More Maps", and "Leaflet
views". modules.
Once everything is enabled, navigate back to the edit page for the
"All DrupalCamps" view. Click to change the Format from "Geofield Map"
to "Leaflet Map". Set the format settings as follows (anything not
listed can be left at default values):
- Data Source: Content: Location lat/lon
- Title Field: Content: Title
- Map: pick one!
The "Map" setting provides numerous different options for various
base layers for your map. Depending on the type of content and/or the
style of the site, one base layer may be more appropriate than another.
There are a good number of other options in the "Leaflet Map" settings,
including the ability to use custom "points" (or "pins") and vector
display options (for when the map is displaying more than just points).
There's also a "Descriptive Content" field that can be used to display
additional content about the DrupalCamp when the pin is clicked. This is
commonly populated with a trimmed version of the body field of the
node.
Wrap-up
Over the years, there have been lots of ways for displaying
interactive maps on a Drupal site. Each iteration provides more features
and easier setup and configuration. What this tutorial covered is just
scratching the surface of what can be done. There are numerous Geofield-
and Leaflet-related modules that extend the functionality of the basics
presented here, be sure to check them out!