Pages

Tuesday, February 16, 2016

Arbitrary "OR" SQL Queries

I was working on a Drupal migration project today using the Migrate module where I needed to import only select user roles from the source (Drupal 6) database.
The Migrate module allows for a custom query to select only the user roles that need to be imported. In my case, the two roles I wanted to import had role IDs of 4 and 6. So, how do I write a query using the Drupal Database API to do this? Turns out there's a pretty elegant answer. Rather than writing something like:
SELECT * FROM role r WHERE rid=4 OR rid=6;
The proper way of writing the select query is:
$query = parent::query();
$ored = db_or();
$ored
->condition('rid', 4)
->condition('rid', 6);
$query->condition($ored);

Note the elegant "db_or()" function that returns a DatabaseCondition object. Add the two conditions to this object, and they're automagically "or"ed.

Drush Lock: Freeze the version of a Module during 'drush up'

Every so often I will find myself needing to update lots of Drupal modules but not one in particular. Perhaps I have patched the module, or perhaps there is a new version of the theme that I know will break my site layout.
Drush can save you from this dilemma, as of version 4.x - yes, it's true!
Just use:
drush up --lock=omega
Assuming Omega is the project that needs to keep the same version number. Omega will not be updated until you reverse the lock.
drush up --unlock=omega
You can also just:
drush up omega
If you want to.

Where did the catpath and termpath tokens go in pathauto?

In the old days of web design, we had to put all of our files in folders, so having a path like example.com/category/sweaters/cashmere/winter-special.html was really common. You could also remove any part of the path and be sure you would get an index page, such as example.com/category/sweaters/index.html.
In a front-controller CMS like Drupal, all the paths are arbitrary, so a hierarchical folder structure has to be faked with URL Aliases. Luckily the community maintains two modules to round out this functionality in Token and Pathauto, along with the excellent Entity API module and the Entity Tokens that comes bundled with it. However, Tokens were completely (and necessarily) rewritten from Drupal 6 to Drupal 7, and some of the cool things you could do with pathauto to emulate old-school folder structures became less transparent.
After a few minutes of searching the issue queue, lo and behold, a replacement for Drupal 6's "catpath" token:
category/[term:parent:url:path]/[term:name]
If your taxonomy is properly arranged in a hierarchy, this acts as a recursive loop to generate the terms that should be properly nested. That means that example.com/sweaters/cashmere/ should show you all the nodes tagged with cashmere, and likewise for example.com/sweaters.
OK, but what about the nodes? No problem there either:
category/[node:category:url:path]/[node:title]
Again, this creates a recursive loop where the path of the node depends on the path of the term, and that depends on its parent terms. (if you'd like to add .html to the end, that is fine too).
The pattern is different depending on the name of your vocabulary. In a site upgraded from Drupal 6, the word "category" will be replaced by a vocabulary ID.
category/[node:taxonomy-vocabulary-2:url:path]/[node:title]
if your field has multiple values you may need to address the term with a delta:
category/[node:taxonomy-vocabulary-2:0:url:path]/[node:title]
Last but not least, if you want absolute control over which term is used you may also want to check out Dave Ried's Taxonomy Entity Index module.
BTW I never used to like putting "category" in front of my URL aliases, but there is a good round up of some security holes you may open by not putting some static text in front of pathauto patterns: Pathauto Patterns that can be Dangerous

Drupal Text Formats and Content for Test Nodes

When building a Drupal-based website or theme, you will invariably create some test nodes of a content type that has at least one text area field. You should then add some example text, to see how those fields will look on the website. But beyond those nodes focused on styling, you may find it necessary or advisable to create a large number of additional test nodes of that content type. When you begin this process, you may wonder whether it would be best to add placeholder text (such as the venerable "Lorem ipsum") or leave those fields empty. Also, are there any ramifications of choosing one text format or another?
If a text area contains no content, then no text format is associated with that particular node's text area, and changes to the text format setting (made through the user interface) are not retained. However, if placeholder text is added to the field, then users who do not have permission for the chosen text format, will naturally not be able to edit the text. Consequently, you or someone else would be forced to change the text formats on all of the problematic nodes — manually or with database commands. On the other hand, if you leave those text areas empty, then those users can add whatever text they want, and specify any of the text formats for which they have permissions.

Hardcoding the Temporary Directory Path

When working on a local copy of a site that also has a production, stage, and/or development environment on another server, it can be handy to hard-code the "Temporary directory" file path as found on admin/config/media/file-system
The reason is so that when you restore a copy of the database from another server to your local machine, you don't have to redo the temporary directory setting. For example, on most sites we build, we set up a shared development environment on WebEnabled (shameless plug) where multiple developers are often configuring different parts of the site. When I want to work locally, I like to have an up-to-date copy of the database. I use the Backup and Migrate module or Drush to copy the database from the shared development environment to my local machine.
To hard-code the temporary directory path of your local site, simply add the following line to the bottom of your local settings.php file:
$conf['file_temporary_path'] = '/tmp';
Where "/tmp" is the your local temporary directory path.

Get notified of new comments with Rules

I know there are modules to handle this, but Rules can do it all:
If you visit admin > config > workflow > rules on your site, start a new Rule like so:
Name: "Notify of new comment"
React on Event: After saving a new comment
I normally tag the rule with the name of the site, like "drupaleasy".
Next add a new Condition:
Select the condition to add: User > User has role(s)
User > Data selector: "comment:author"
Roles > Value: administrator
check the Negate box
This looks at the role of the person who just left the new comment. If he or she is an administrator, this rule wil not fire. Chances are, if an admin left a comment, you don't want to know about it. On most sites I don't add this condition, but on a single-user site like a blog, this rule will make a lot of sense.
Next add an Action - this is what you want to happen when a new comment is created (that was not added by the administrator):
System: Send mail
To > Value: "[site:mail]"
Subject > Value: "New comment on [comment:node]"
Message > Value:
[site:url]admin/content/comment/approval
[comment:url]
[comment:title] - [comment:node]
at [comment:created] by [comment:author]
[comment:mail] - [comment:homepage]
[comment:body]
[comment:edit-url]
From > Value: "[comment:mail]"
On my sites, Anonymous comments have to pass approval - we just get too much spam otherwise. Luckily, now that we have this rule in place, we can think about lifting the approval gate so comments appear instantaneously while still helping us cut down on spam.
Here is an exported version of the rule:
{ "rules_notify_of_new_comments" : {
    "LABEL" : "Notify of new Comments",
    "PLUGIN" : "reaction rule",
    "TAGS" : [ "drupaleasy" ],
    "REQUIRES" : [ "rules", "comment" ],
    "ON" : [ "comment_insert" ],
    "IF" : [
      { "NOT user_has_role" : {
          "account" : [ "comment:author" ],
          "roles" : { "value" : { "3" : "3" } }
        }
      }
    ],
    "DO" : [
      { "mail" : {
          "to" : "[site:mail]",
          "subject" : "New comment on [comment:node:title]",
          "message" : "[site:url]admin\/content\/comment\/approval\r\n[comment:url]\r\n\r\n[comment:title]\t - [comment:node]\r\nat [comment:created] by [comment:author]\r\n[comment:mail] - [comment:homepage]\r\n\r\n[comment:body]\r\n\r\n[comment:edit-url]",
          "from" : "[comment:mail]"
        }
      }
    ]
  }
}

Enabling Drupal 7 'www' Redirection on a Local Host

Drupal 7's HTTP access file, .htaccess, contains some URL rewriting code for redirecting all site visitors to the domain name starting with "www.", in case they try to go to the domain name without the prefix. For instance, you might want all visitors to go to www.example.com, and never example.com, for SEO purposes.
This is achieved by uncommenting the code on lines 81-82:

RewriteCond %{HTTP_HOST} !^www\. [NC]
RewriteRule ^ http://www.%{HTTP_HOST}%{REQUEST_URI} [L,R=301]

This works fine when used on a remote server, but not on a local server that is not set up to handle the prefix. For instance, if you have a local installation of Drupal at http://localhost/my_site/, then the rewrite code will change that into an invalid URL: http://www.localhost/my_site/
This problem can be fixed by adding the following line above the RewriteRule:

RewriteCond %{HTTP_HOST} !^localhost$ [NC]

Or, more simply, the existing RewriteCond line can be modified:

RewriteCond %{HTTP_HOST} !^(www\.|localhost$) [NC]

Filter a view based on empty Imagefield

Turns out there is no filter that asks wether or not an imagefield (or filefield) has a value. I came across this tip on Drupal.org. The recommendation was to use a relationship, and then choose "Require this relationship" to act as a filter. Pretty cool.
So assuming your imagefield is just called "Image", here is the walkthrough:
  1. Add a new view of type "node"
  2. Add one or more fields (I assume you want to include the image field) in the normal way
  3. Click the button next to Relationships to open the dialog for adding relationships
  4. From the "Content" group, choose your Image field (which will be followed by "fid")
  5. Make sure you click the "Require this relationship" box when adding the relationship
That should be it!
I don't know if this changes for Views 3.x and Drupal 7, but this is the only way to do this in Drupal 6 and Views 2.x. You're welcome.

I can't log in to my Drupal site - every page says "access denied"

Once upon a time I updated a Drupal site and was unable to log in after the update was complete. I tried messing with the $cookie_domain and $base_url to no avail. When I used the Web Inspector or Firebug to view my Cookies I noticed I was not getting a familiar PHP Session Cookie.
Here's how to check:
  1. Chrome or Safari: right click and Inspect Element, then switch to the "Resources" tab, click "Cookies" then the domain name of your site, like "drupaleasy.com".
  2. Firebug: Open Firebug, click the "Cookies" tab (you may have to enable it first) 
  3. Firefox: Open the "Developer Toolbar" (shift+F2 or Tools > Web Developer > Developer Toolbar) and a small black bar appears at the bottom of your window. Type:
    cookie list
  4. All of the above: Open the Javascript Console and type: document.cookie
Make sure you can see a cookie that starts with SESS. Try to log in and look again.
If you don't see one, sessions are likely messed up. Try truncating your session table in your site's database.
From the sql command line:
truncate table sessions;
Everyone who is currently logged in will be logged out, but in my case I was now able to log in. Hope that helps.
If you use a graphical tool like phpMyAdmin, you can truncate a table by clicking on the box next to the "sessions" table and choosing the "Empty" option.

Drupal 7 Check for Available Updates Solution

On a Drupal 7 website's "Available updates" page (admin/reports/updates/update), if and when you request that Drupal manually check for updates (of modules and themes), it can sometimes fail to get available update data for most or all of the projects, regardless of how many times you retry the process. The problem is caused by errant records in the cache_update table in the Drupal database, which apparently are not removed by the update request. In theory, this should be fixable by requesting that the system clear all of the caches (admin/config/development/performance), but even that operation can fail to empty the table. In this case, you must empty — "truncate", in database parlance, not "drop" — that table yourself and then manually check for update data again.

Limiting Drupal Registrations to Profiles

If you are using the Profile 2 module to set up multiple profiles in a Drupal website, and you want each visitor to register any new account using only one of those profiles, then you should redirect the Drupal path "user/register" — using a URL alias or an HTTP redirect — to a new page that explains the different profiles and has links to the unique registration pages for each one. (For any profile P, the Drupal path to the profile-specific registration page would be "/P/register".) Otherwise, a visitor may arrive at the generic registration page (intentionally or otherwise) and create a new account independent of those profiles.

Drush on Mac OS X Troubles? Could be a Case Issue...

I recently discovered the solution to a long-standing drush issue I have been experiencing on Mac OS X. The symptoms of the problem included several mysterious fatal errors that would crop up from time-to-time as well as the fact that I've had to use the --uri=mysite.dev parameter for every local site on my computer.
I finally tracked down the issue to case-sensitivity. On my Mac, I keep all my local sites in the /Users/michael/Sites directory - this is the default directory that comes with OS X, and can be used by the Mac's built-in version of Apache. I use both MAMP Pro (for client sites) and Acquia Dev Desktop (for teaching), and every site I have lives in this directory.
Up until yesterday, whenever I would fire up my Terminal app, I would (by default) be deposited in /Users/michael, so my first order of business would be to do a cd sites/[directory of the site I wanted to work with]. While that worked fine as far as my Mac was concerned, when I then went to run a drush command, I would either get a fatal error (cannot redeclare a function) or drush wouldn't know which site it was in, and I'd be forced to either use a drush alias or the --uri=mysite.dev parameter. It turns out that because drush is (and most *nix-y tools are) case sensitive, it wasn't actually finding my site, hence the need for the --uri=mysite.dev parameter.
The solution is dead simple. When I fire up my Terminal app, I now use cd Sites, with a capital "S" (actually, I just set a new default directory for it). So far (less than 24 hours in), this has solved every single drush issue I had been having.

Re-ordering Views Attachment Displays

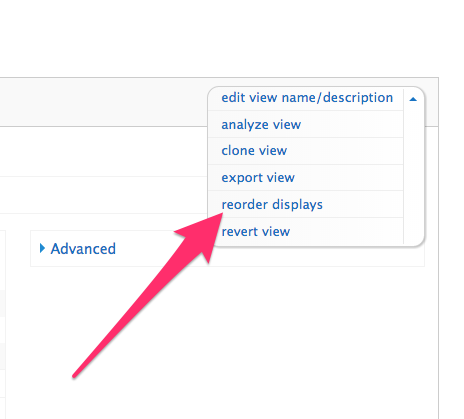
If you have a Drupal 7 view with more than one attachment display, it is not super-obvious how you can reorder the displays. When you create a new attachment display, you can choose the display to attach the attachment display to as well as the position ("before", "after", or "both").
But what if you need to attach two attachment displays "before" another display - how can you control the order of the two attachment displays.
it's actually quite easy once you know how - in the view's "edit view name/description", there is a "reorder displays" option. Click it and behold!
Views screenshot

Debugging with PhpStorm (Including Drush)

I recently made the switch from another (several) code editors to PhpStorm based on the recommendations of several members of the Drupal community - not to mention all the postive things I've heard about it on IRC and various other places.
My main motivation for making the switch was the ability to have a integrated debugger - both when running Drupal in a web browser and via Drush. While there are plenty of resources online demonstrating how to set up the debugger, I found that I needed to do a combination of things to make it happen

Enable xDebug

Depending on your *AMP stack, xDebug may or may not be enabled by default. I use MAMP Pro, and it wasn't. It was easy enough to enable - I added the following to my php.ini file (note that the path will be dependent on the version of PHP you'd like to use):
[xdebug]
zend_extension="/Applications/MAMP/bin/php/php5.4.4/lib/php/extensions/no-debug-non-zts-20100525/xdebug.so"
xdebug.profiler_enable = 0
xdebug.profiler_output_dir = "/tmp"
xdebug.remote_enable=1
xdebug.remote_host=localhost
xdebug.remote_port=9000
xdebug.remote_handler=dbgp
xdebug.max_nesting_level=500
xdebug.idekey=PHPSTORM

To make it work from the command line (Drush), I also had to add this stuff to another php.ini file. I figured out which one by doing a drush status and seeing which PHP configuration it was using. Here's some documentation demonstrating how to confirm you're good-to-go.

Update .bash_profile

If you want to be able to debug Drush commands, you'll need to add the following to your .bash_profile:
export XDEBUG_CONFIG="idekey=PHPSTORM"
If you're using another command line interface, you'll need to make a similar addition. Be sure to source ~/.bash_profile after you make the change (or restart your terminal session). See Angus Max's post on Lullabot.com for more details.

Configure PhpStorm

JetBrains (the makers behind PhpStorm) provide decent online documentation - I found this post and this screencast especially helpful. For my situation, where I wanted to debug a local site, the following settings are key:

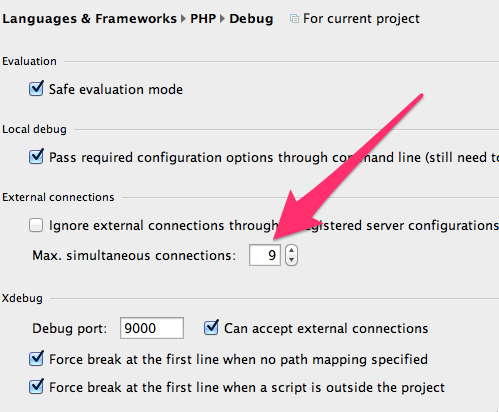
Max. Simultaneous Connections

When debugging automated tests using the run-tests.sh script, it is crucial that PhpStorm's "Max Simultaneous Connections" for PHP Debugging is set to a sufficiently large value. "9" works for me.
Max. Simultaneous Connections

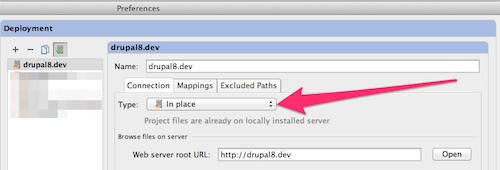
Setting up a deployment server

Configuring a deployment server is one of the key things you need to do in order to debug in PhpStorm. While PhpStorm supports remote debugging, for my situation, the "In place" deployment type was sufficient.
Deployment server type: In place
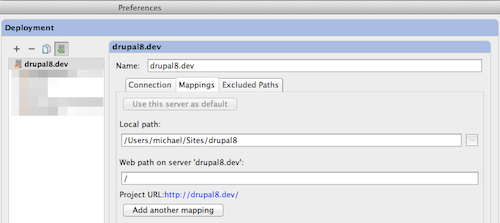
The deployment server mappings were left at their default values:
Deployment server mappings

Troubleshooting

At this point, you should be able to enable the PhpStorm debugging listener, go into your browser, turn debugging on (either via a browser extension or bookmarklet
and happily debug away. If it doesn't work, here are a couple of things you can take a look at:
  1. Case-senstitivity in paths - on my machine, the path to my "Sites" directory is "/Users/michael/Sites". I had an issue where breakpoints weren't working that I tracked down to a lower case "s" in "Sites" that I mistakenly set up in my Apahce virtual host for the site ("/Users/michael/sites" instead of "/Users/michael/Sites").
  2. xdebug version - some versions of xdebug are better than others. Several months ago I had an issue with xdebug not working properly when debugging from the commandline (Drush). I tracked it down to an old, buggy version of xdebug. I updated xdebug and all was well.
  3. Some people use PhpStorm "configurations" to configure debugging, while this works fine, it isn't necessary. I have zero "configurations" configured on my machine.
  4. Debugging from Drush - be sure to set your PHP_ID_CONFIG value to same value as your PhpStorm project "server". 
  5. Do you use Acquia Dev Desktop? 

Drupal 8 paths inconsistencies

While Drupal 8 has plenty of things to be excited about, there are a few "gotchas" that site-builders need to be aware of as they build out sites. I found the first thing that I had trouble with was the way that Drupal 8 isn't very consistent (yet?) with the way it handles paths. In Drupal 7 and before, anytime you needed to enter a path, it (almost?) never started with a leading "/". For example, need to add an new alias for a node? You would enter "my-new-node", not "/my-new-node".
With Drupal 8, a leading slash is required for path aliases. Unfortunately, leading slashes are not required everywhere. For example, in Drupal 8 page displays in Views do not require a leading slash. Neither do contact form post-submit redirects (they actually require something like "entity:node/743"!) But, block visibility settings require the leading slash. In most cases, the help text indicates when the leading slash is necessary, so it helps to pay attention!

X Marks the Spot: A Beginner's Guide to Online Maps in Drupal

X Marks the Spot sample map
Mapping address data in Drupal can be confusing, if only because of the great number of contributed modules available that involve online maps. Picking the right module (or combination of modules) is challenging - especially for site builders who are new to mapping in Drupal. In this tutorial, we'll utilize the popular and well-supported Geofield module as one of the key ingredients in the common task of entering address data and having it displayed on an interactive map.
This tutorial contains step-by-step instructions for accomplishing this task, as well as a screencast demonstrating all of the steps.
We'll use the example of adding DrupalCamp address information to a Drupal 7 site. The site will then automatically display the DrupalCamp on a map on each camp's page, as well as display all camps on a single map. Finally, we're going to look at some of the options for using different map base layers.
This tutorial assumes that you're familiar with Drupal's "big 5" (content types, taxonomy, menus, users/roles/permissions, and blocks/regions/themes), the Views module, as well as downloading, installing, and enabling modules.
Here are the basic steps of what we'll be doing:
  1. Create a new DrupalCamp content type with a standard (postal) address field.
  2. Add a (Geofield) field to the DrupalCamp content type to store each address's corresponding latitude and longitude. The Geocoder module will be used to convert the postal address into latitude and longitude values.
  3. Configure the DrupalCamp content type so that a the latitude and longitude field are displayed as a map.
  4. Create a view that displays all DrupalCamp nodes' address information on a single map.
  5. Check out the various options for changing the look of the maps.

Screencast

Create a new "DrupalCamp" Content Type

We're going to use the Address Field module (which requires the Chaos tools module) to allow users to easliy input postal address information for each camp. Once the module is enabled, create a new "DrupalCamp" content type and add a new field of type "Postal address" (provided by the Address Field module). Give it a label of "Location", and set its configuration as follows (anything not listed can be left at default values):
  • Available countries: United States
  • Format handlers: Address form (country-specific) and Name
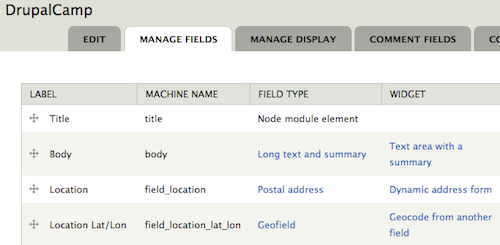
DrupalCamp content type

Provide a Field to Store Latitude and Longitude

The Geofield module is used to store geographic data in Drupal 7. It can store points, lines, and polygons, but for this example, we'll just be storing individual points (locations) - luckily, this is the easiest (and most common) scenario. The Geofield module also requires the Chaos tools module as well as the geoPHP module.
The Geofield module also comes with the Geofield Map module, which we'll be using later in this tutorial.
Before we go ahead and add a new Geofield field type field to our DrupalCamp content type, we're going to want to go ahead and also enable the Geocoder module. This is because the Geocoder module provides a widget for the Geofield field type that we're going to use. The Geocoder module also requires the Chaos tools and geoPHP modules.
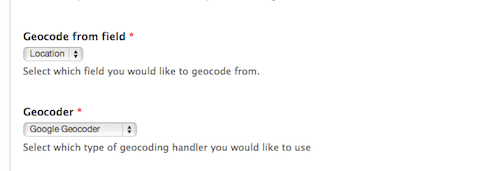
Now that we have all the required modules enabled, let's go ahead and add a new field to our DrupalCamp content type. Give it a label of "Location lat/lon", use a field type of "Geofield", and set its widget to "Geocode from another field" (this is where the Geocoder module comes in). Settings for the field are (anything not listed can be left at default values):
  • Geocode from field: Location
  • Geocoder: Google Geocoder
DrupalCamp Location Lat/Lon field settings
These two field settings are the key for automatically converting postal address data entered in the "Location" field into latitude/longitude data stored in the "Location lat/lon" field. The settings instruct the Geocoder module to grab the postal address data and send it to the Google Geocoder web service which does the heavy lifting of converting it to a latitude and longitude. Other geocoding services are available, but each one provides different capabilities and different usage limits. For Google Geocoder:
Note: you'll need to have an active internet connection for the Geocoding to work.
Feel free to add other fields to the DrupalCamp content type at your lesiure, but for this tutorial, this is all that we're going to need.

Display a Map for Each DrupalCamp Node

At this point, we're ready to add some DrupalCamp nodes. Find some DrupalCamps to enter - be sure to enter complete location information for each.
You'll notice that as each one is added the "Location lat/lon" field displays something like "POINT (-90.3288385 38.6491536)". Navigate on over to the "Manage Display" settings for the DrupalCamp content type and notice that the formatter for the field is set to "Well Known Text (WKT)". According to Wikipedia:
Well Known Text (WKT) is a text markup language for representing vector geometry objects on a map, spatial reference systems of spatial objects and transformations between spatial reference systems.
While useful, it doesn't really provide site visitors with what they're looking for. By enabling the Geofield Map module (which comes with Geofield), we can now utilize the "Geofield Map" formatter on the "Location lat/lon" field (via the "Manage Display" page of our DrupalCamp content type). Select this, then set the formatter's settings as follows (anything not listed can be left at default values):
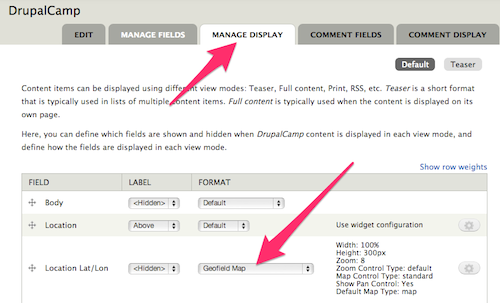
  • Zoom: 15
DrupalCamp content type Manage Display settings
Now, go back and take a look at one of your DrupalCamp nodes; instead of the Well Known Text data, you should see a Google Map with a pin at the location of the DrupalCamp. Note that this is a fully-enabled Google Map that you can pan, zoom, and do most anything else you do with any other Google Map.
Note: you'll need to have an active internet connection for the map to display.

View All DrupalCamps on a Single Map

The ability to view numerous DrupalCamps on a single map is the next logical step. The Views module provides the ability to display lists of content. In this case, our content is DrupalCamp, and instead of a traditional "list", we're going to output our view as a map.
Let's create a new view called "All DrupalCamps". Give it a single page display with a path of "all-drupalcamps" and filter it by:
  • Content: Published = Yes
  • Content: Type = DrupalCamp
For fields, we'll keep it simple:
  • Content: Title
  • Content: Location lat/lon
In the "Content: Location lat/lon" settings, click to "Exclude it from display" and leave other settings at their default values.
We want to be sure that we display all the DrupalCamp nodes on a single map, so modify the Pager settings as well:
  • Pager: Display all items
All that is left at this point is to set the Format of the display. Click on "Unformatted text" in the Format settings, and change the format to "Geofield Map". For its settings use the following (anything not listed can be left at default values):
  • Data Source: Location lat/lon
  • Popup Text: title
The "Data Source" setting tells the Geofield Map formatter where to look for the latitude and longitude data. In this case, the Geofield-based "Location lat/lon" field that we included in our list of fields for this view. The "Popup Text" setting instructs Geofield Map to use the title field as the text to display when the camp's pin is clicked.
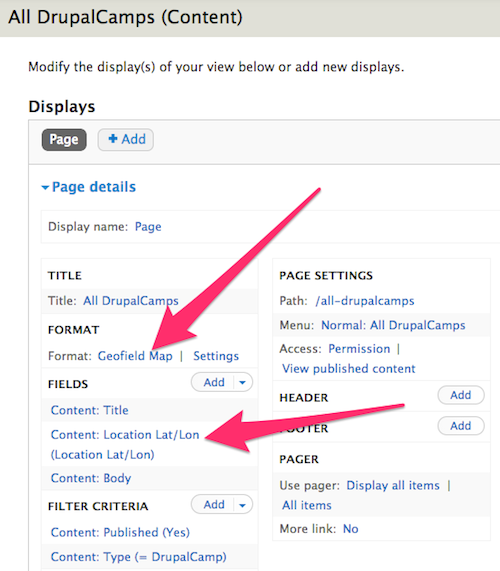
DrupalCamp All DrupalCamps view
Navigate to the "all-drupalcamps" page on your site and you should see a Google Map with a pin displayed for each DrupalCamp node on your site.

Alternative Map Styles

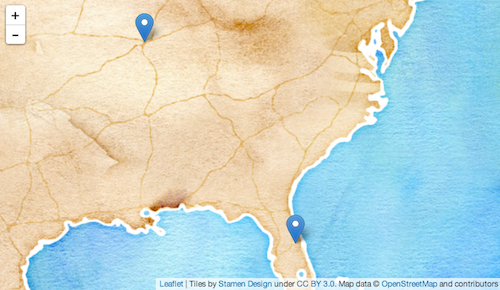
While the Geofield Map module outputs only Google Maps, the Leaflet module provides a number of alternative "base layers" that can give your map various looks. While the Leaflet module does a lot more than just provide alternate base layers, we'll only be looking at this functionality in this tutorial.
The Leaflet module requires the Libraries module, the Entity API module, as well as the 3rd-party Leaflet JS library. Be sure to read the installation instructions to make sure everything is installed properly.
The Leaflet module comes with several modules. For this tutorial, we'll need to enable the "Leaflet", "Leaflet More Maps", and "Leaflet views". modules.
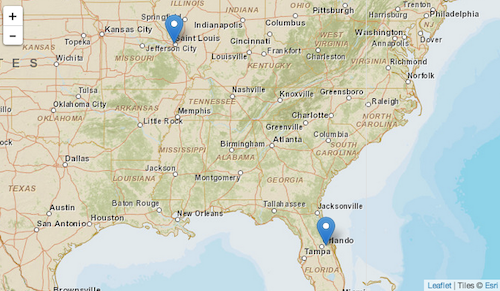
Once everything is enabled, navigate back to the edit page for the "All DrupalCamps" view. Click to change the Format from "Geofield Map" to "Leaflet Map". Set the format settings as follows (anything not listed can be left at default values):
  • Data Source: Content: Location lat/lon
  • Title Field: Content: Title
  • Map: pick one!
Leaflet map
The "Map" setting provides numerous different options for various base layers for your map. Depending on the type of content and/or the style of the site, one base layer may be more appropriate than another. There are a good number of other options in the "Leaflet Map" settings, including the ability to use custom "points" (or "pins") and vector display options (for when the map is displaying more than just points). There's also a "Descriptive Content" field that can be used to display additional content about the DrupalCamp when the pin is clicked. This is commonly populated with a trimmed version of the body field of the node.

Wrap-up

Over the years, there have been lots of ways for displaying interactive maps on a Drupal site. Each iteration provides more features and easier setup and configuration. What this tutorial covered is just scratching the surface of what can be done. There are numerous Geofield- and Leaflet-related modules that extend the functionality of the basics presented here, be sure to check them out!
What’s new on Drupal.org? - January 2016

Following the Conversation

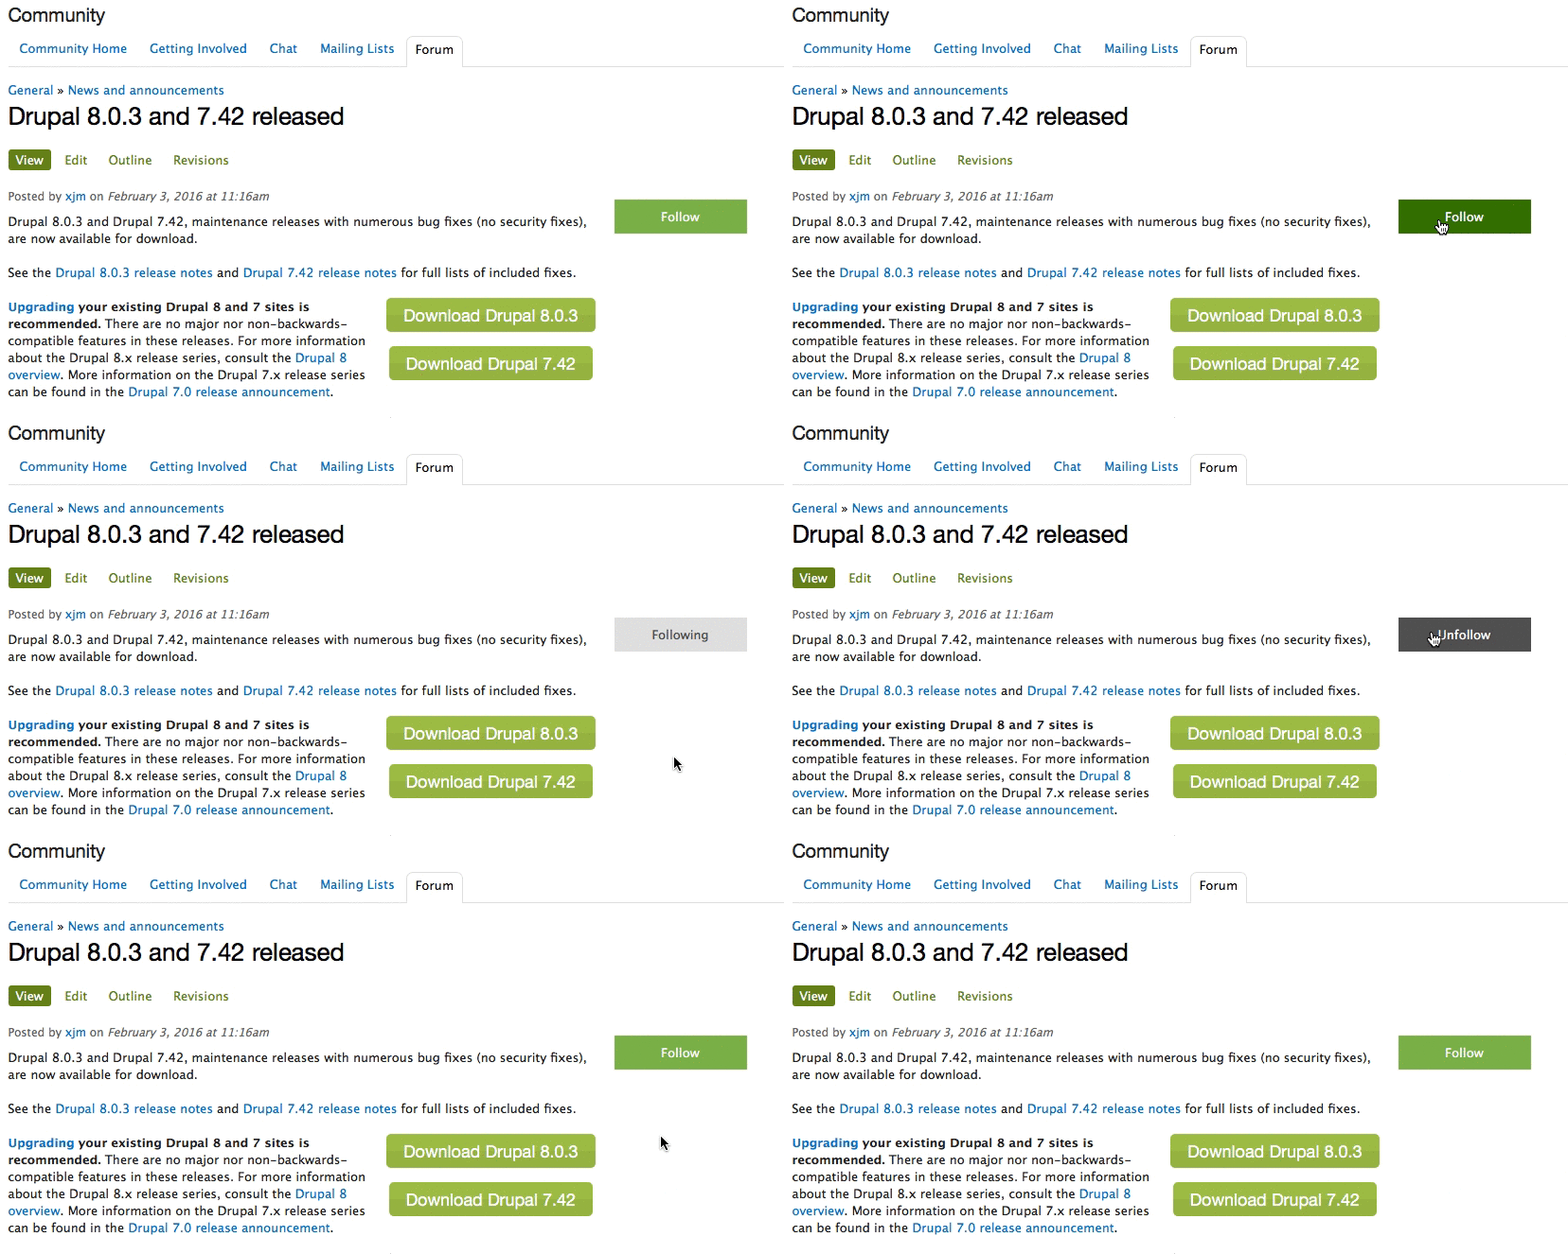
One of the most requested features from a wide swath of the community has been a better way to follow content on Drupal.org and receive email notifications. The issue queues have had this follow functionality for some time, but the implementation was quite specific to issues, and not easily extensible to the rest of the site.

Because of the volume of content on Drupal.org we have to be careful that our implementation will scale well. We now use a notification system based on the Message stack which functions much more generically and therefore can be applied to many content types on Drupal.org.
Follow functionality is now available for comments on Forum topics, Posts (like this one), Case Studies, and documentation Book Pages.
In the future we intend to extend this follow functionality to include notification of new revisions (for relevant content types, particularly documentation).

Community Elections for the Board


Nominations for the position of At-Large Director from the community are now open. There are two of these positions on the board, each elected on alternating years. For this year's elections process we've made several small refinements:
  • Candidates are now no longer required to display their real names on their candidate profile. We will now default to the Drupal.org username.
  • Candidates do not have to provide a photo, we will default to a generic avatar.
  • There is now an elections landing page with complete details about the elections process.
We encourage members of the community to nominate themselves!

Drupal.org Enhancements


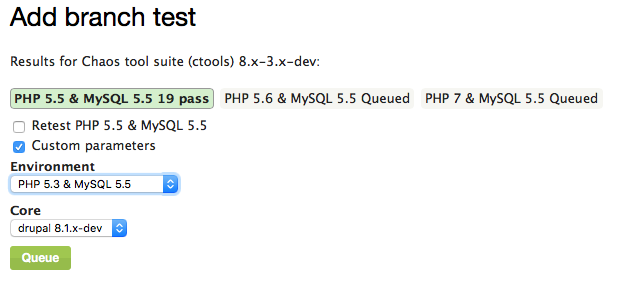
A number of smaller enhancements made it into the January sprints as well. One of the key ones was the ability to configure an arbitrary one-off test in the issue queues against a custom branch. This is a small step towards ensuring that the DrupalCI testing framework will support the wider testing matrix required for feature branching, so that Drupal can always be shippable.
We also spent some time in January reviewing the results of the documentation survey that was placed on all existing documentation pages on the site. This information is helping to inform the next big item on the roadmap - improved Documentation section on Drupal.org.
Finally, we've continued our battle against spam with the help of Technology Supporter, Distil Networks. We've seen some very promising results in initial trials to prevent spam account registrations from happening in the first place, and will continue to work on refining our integration.

Sustaining support and maintenance


DrupalCon New Orleans Full -Site Launched!

In January we also launched the full -site for DrupalCon New Orleans with registration and the call for papers. As part of this launch, Events.drupal.org now supports multiple, simultaneous event registrations with multiple currencies, payment processors, and invoice formats. This was a significant engineering lift, but has made Events.drupal.org even more robust.
DrupalCon New Orleans is happening from May 9-13th, and will be the first North American DrupalCon after the release of Drupal 8!

DrupalCon Dublin


The next European DrupalCon will also be here before you know it, and we've been working with the local community and our designer to update the DrupalCon Dublin splash page with a new logo that we will carry through into the design for the full-site once that is ready to launch.

Permissions for Elevated Users

In January we also focused on auditing the users with elevated privileges on Drupal.org, both to ensure that they had the permissions they needed, and to enforce our principle of least-access. Users at various levels of elevated privileges were contacted to see if they were still needed, and if not those privileged roles were removed.
The following privileges were also fixed or updated: webmasters can now view a user's' public ssh keys; content moderators can administer comments and block spam users without user profile editing privileges. We also fixed taxonomy vocabulary access and now both content moderators and webmasters have access to edit tags in various vocabularies such as Issue tags, giving more community members access to clean those up and fight duplicates or unused tags.

Updates traffic now redirects to HTTPS

SSL is now the default for FTP traffic from Drupal.org and for Updates.drupal.org itself. This helps to enforce a best practice of using SSL wherever possible, and helps to address an oblique attack surface where a man-in-the-middle could potentially hijack an update for someone running their Drupal installation on an unprotected network (i.e. development environments on a personal laptop in a coffee shop).

Devwww2 Recovery

Drupal.org pre-production environments were affected by some instability in January, particulary the devwww2 server. A combination of a hard restart due to losing a NIC on the machine and some file-system level optimizations in the database containers lead to corruption on the dev site databases. Drupal.org infrastructure engineers restored the system and recovered the critical dev sites, and while some instability continues the system has been recovering more cleanly as they work to resolve the issue permanently.