Pages

Wednesday, February 17, 2016

Drupal 8 paths inconsistencies

While Drupal 8 has plenty of things to be excited about, there are a few "gotchas" that site-builders need to be aware of as they build out sites. I found the first thing that I had trouble with was the way that Drupal 8 isn't very consistent (yet?) with the way it handles paths. In Drupal 7 and before, anytime you needed to enter a path, it (almost?) never started with a leading "/". For example, need to add an new alias for a node? You would enter "my-new-node", not "/my-new-node".
With Drupal 8, a leading slash is required for path aliases. Unfortunately, leading slashes are not required everywhere. For example, in Drupal 8 page displays in Views do not require a leading slash. Neither do contact form post-submit redirects (they actually require something like "entity:node/743"!) But, block visibility settings require the leading slash. In most cases, the help text indicates when the leading slash is necessary, so it helps to pay attention!

X Marks the Spot: A Beginner's Guide to Online Maps in Drupal

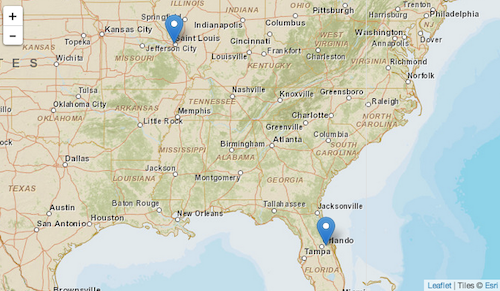
X Marks the Spot sample map
Mapping address data in Drupal can be confusing, if only because of the great number of contributed modules available that involve online maps. Picking the right module (or combination of modules) is challenging - especially for site builders who are new to mapping in Drupal. In this tutorial, we'll utilize the popular and well-supported Geofield module as one of the key ingredients in the common task of entering address data and having it displayed on an interactive map.
This tutorial contains step-by-step instructions for accomplishing this task, as well as a screencast demonstrating all of the steps.
We'll use the example of adding DrupalCamp address information to a Drupal 7 site. The site will then automatically display the DrupalCamp on a map on each camp's page, as well as display all camps on a single map. Finally, we're going to look at some of the options for using different map base layers.
This tutorial assumes that you're familiar with Drupal's "big 5" (content types, taxonomy, menus, users/roles/permissions, and blocks/regions/themes), the Views module, as well as downloading, installing, and enabling modules.
Here are the basic steps of what we'll be doing:
  1. Create a new DrupalCamp content type with a standard (postal) address field.
  2. Add a (Geofield) field to the DrupalCamp content type to store each address's corresponding latitude and longitude. The Geocoder module will be used to convert the postal address into latitude and longitude values.
  3. Configure the DrupalCamp content type so that a the latitude and longitude field are displayed as a map.
  4. Create a view that displays all DrupalCamp nodes' address information on a single map.
  5. Check out the various options for changing the look of the maps.

Screencast

Create a new "DrupalCamp" Content Type

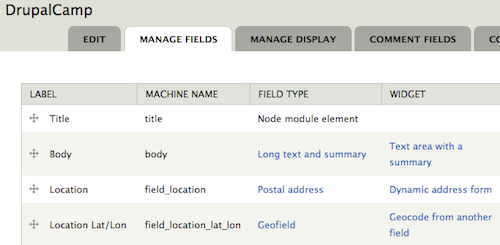
We're going to use the Address Field module (which requires the Chaos tools module) to allow users to easliy input postal address information for each camp. Once the module is enabled, create a new "DrupalCamp" content type and add a new field of type "Postal address" (provided by the Address Field module). Give it a label of "Location", and set its configuration as follows (anything not listed can be left at default values):
  • Available countries: United States
  • Format handlers: Address form (country-specific) and Name
DrupalCamp content type

Provide a Field to Store Latitude and Longitude

The Geofield module is used to store geographic data in Drupal 7. It can store points, lines, and polygons, but for this example, we'll just be storing individual points (locations) - luckily, this is the easiest (and most common) scenario. The Geofield module also requires the Chaos tools module as well as the geoPHP module.
The Geofield module also comes with the Geofield Map module, which we'll be using later in this tutorial.
Before we go ahead and add a new Geofield field type field to our DrupalCamp content type, we're going to want to go ahead and also enable the Geocoder module. This is because the Geocoder module provides a widget for the Geofield field type that we're going to use. The Geocoder module also requires the Chaos tools and geoPHP modules.
Now that we have all the required modules enabled, let's go ahead and add a new field to our DrupalCamp content type. Give it a label of "Location lat/lon", use a field type of "Geofield", and set its widget to "Geocode from another field" (this is where the Geocoder module comes in). Settings for the field are (anything not listed can be left at default values):
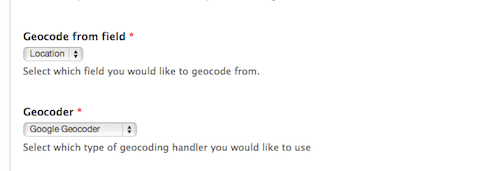
  • Geocode from field: Location
  • Geocoder: Google Geocoder
DrupalCamp Location Lat/Lon field settings
These two field settings are the key for automatically converting postal address data entered in the "Location" field into latitude/longitude data stored in the "Location lat/lon" field. The settings instruct the Geocoder module to grab the postal address data and send it to the Google Geocoder web service which does the heavy lifting of converting it to a latitude and longitude. Other geocoding services are available, but each one provides different capabilities and different usage limits. For Google Geocoder:
Note: you'll need to have an active internet connection for the Geocoding to work.
Feel free to add other fields to the DrupalCamp content type at your lesiure, but for this tutorial, this is all that we're going to need.

Display a Map for Each DrupalCamp Node

At this point, we're ready to add some DrupalCamp nodes. Find some DrupalCamps to enter - be sure to enter complete location information for each.
You'll notice that as each one is added the "Location lat/lon" field displays something like "POINT (-90.3288385 38.6491536)". Navigate on over to the "Manage Display" settings for the DrupalCamp content type and notice that the formatter for the field is set to "Well Known Text (WKT)". According to Wikipedia:
Well Known Text (WKT) is a text markup language for representing vector geometry objects on a map, spatial reference systems of spatial objects and transformations between spatial reference systems.
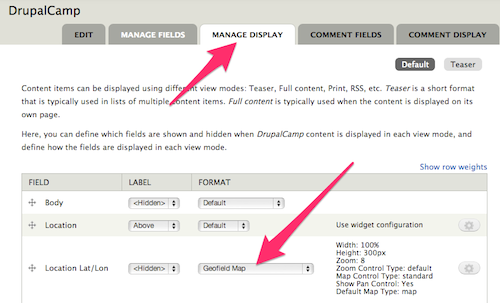
While useful, it doesn't really provide site visitors with what they're looking for. By enabling the Geofield Map module (which comes with Geofield), we can now utilize the "Geofield Map" formatter on the "Location lat/lon" field (via the "Manage Display" page of our DrupalCamp content type). Select this, then set the formatter's settings as follows (anything not listed can be left at default values):
  • Zoom: 15
DrupalCamp content type Manage Display settings
Now, go back and take a look at one of your DrupalCamp nodes; instead of the Well Known Text data, you should see a Google Map with a pin at the location of the DrupalCamp. Note that this is a fully-enabled Google Map that you can pan, zoom, and do most anything else you do with any other Google Map.
Note: you'll need to have an active internet connection for the map to display.

View All DrupalCamps on a Single Map

The ability to view numerous DrupalCamps on a single map is the next logical step. The Views module provides the ability to display lists of content. In this case, our content is DrupalCamp, and instead of a traditional "list", we're going to output our view as a map.
Let's create a new view called "All DrupalCamps". Give it a single page display with a path of "all-drupalcamps" and filter it by:
  • Content: Published = Yes
  • Content: Type = DrupalCamp
For fields, we'll keep it simple:
  • Content: Title
  • Content: Location lat/lon
In the "Content: Location lat/lon" settings, click to "Exclude it from display" and leave other settings at their default values.
We want to be sure that we display all the DrupalCamp nodes on a single map, so modify the Pager settings as well:
  • Pager: Display all items
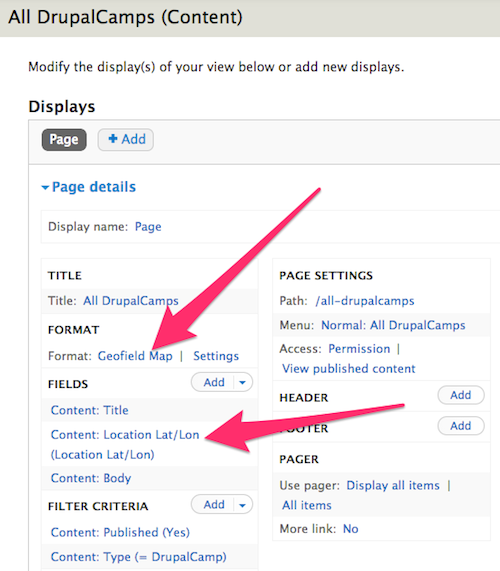
All that is left at this point is to set the Format of the display. Click on "Unformatted text" in the Format settings, and change the format to "Geofield Map". For its settings use the following (anything not listed can be left at default values):
  • Data Source: Location lat/lon
  • Popup Text: title
The "Data Source" setting tells the Geofield Map formatter where to look for the latitude and longitude data. In this case, the Geofield-based "Location lat/lon" field that we included in our list of fields for this view. The "Popup Text" setting instructs Geofield Map to use the title field as the text to display when the camp's pin is clicked.
DrupalCamp All DrupalCamps view
Navigate to the "all-drupalcamps" page on your site and you should see a Google Map with a pin displayed for each DrupalCamp node on your site.

Alternative Map Styles

While the Geofield Map module outputs only Google Maps, the Leaflet module provides a number of alternative "base layers" that can give your map various looks. While the Leaflet module does a lot more than just provide alternate base layers, we'll only be looking at this functionality in this tutorial.
The Leaflet module requires the Libraries module, the Entity API module, as well as the 3rd-party Leaflet JS library. Be sure to read the installation instructions to make sure everything is installed properly.
The Leaflet module comes with several modules. For this tutorial, we'll need to enable the "Leaflet", "Leaflet More Maps", and "Leaflet views". modules.
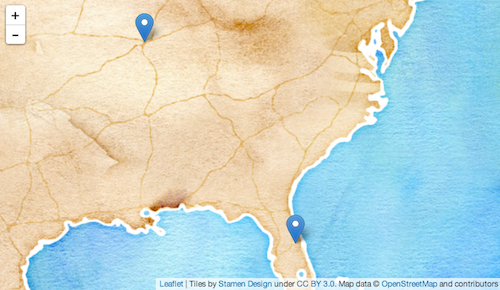
Once everything is enabled, navigate back to the edit page for the "All DrupalCamps" view. Click to change the Format from "Geofield Map" to "Leaflet Map". Set the format settings as follows (anything not listed can be left at default values):
  • Data Source: Content: Location lat/lon
  • Title Field: Content: Title
  • Map: pick one!
Leaflet map
The "Map" setting provides numerous different options for various base layers for your map. Depending on the type of content and/or the style of the site, one base layer may be more appropriate than another. There are a good number of other options in the "Leaflet Map" settings, including the ability to use custom "points" (or "pins") and vector display options (for when the map is displaying more than just points). There's also a "Descriptive Content" field that can be used to display additional content about the DrupalCamp when the pin is clicked. This is commonly populated with a trimmed version of the body field of the node.

Wrap-up

Over the years, there have been lots of ways for displaying interactive maps on a Drupal site. Each iteration provides more features and easier setup and configuration. What this tutorial covered is just scratching the surface of what can be done. There are numerous Geofield- and Leaflet-related modules that extend the functionality of the basics presented here, be sure to check them out!

What’s new on Drupal.org? - January 2016

Following the Conversation

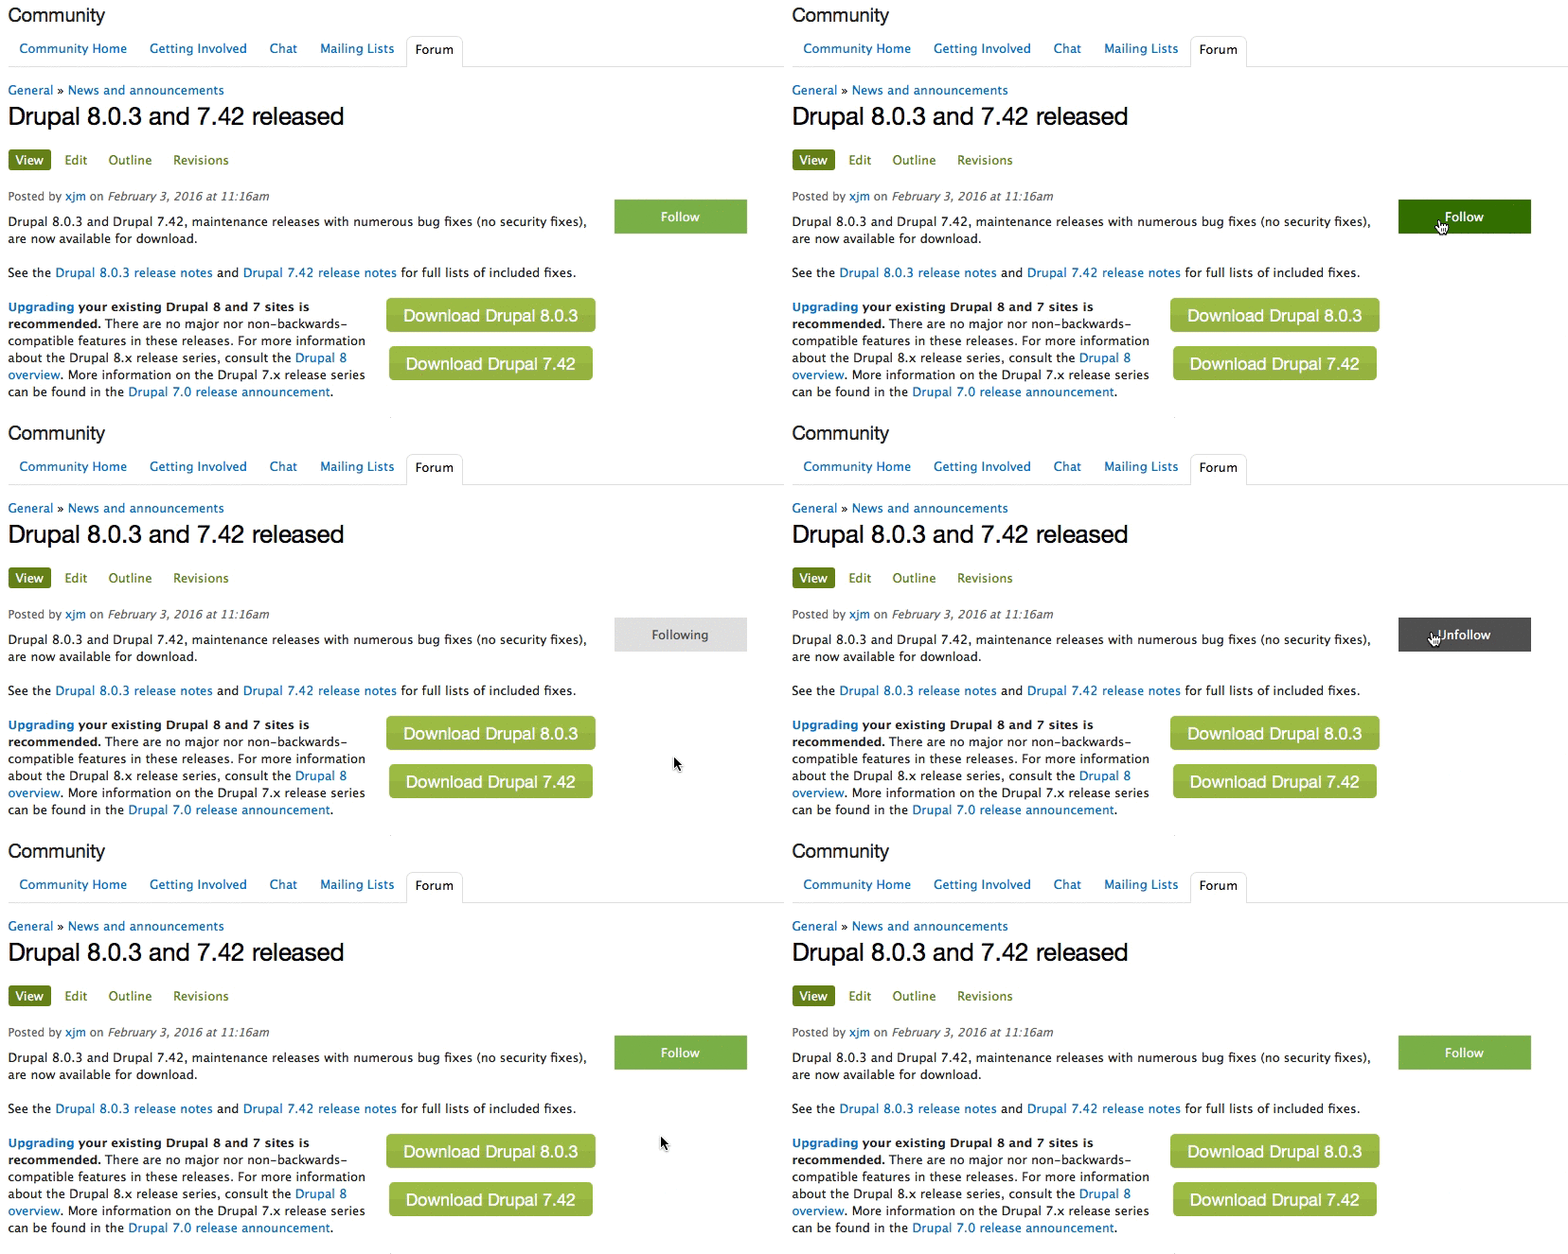
One of the most requested features from a wide swath of the community has been a better way to follow content on Drupal.org and receive email notifications. The issue queues have had this follow functionality for some time, but the implementation was quite specific to issues, and not easily extensible to the rest of the site.

Because of the volume of content on Drupal.org we have to be careful that our implementation will scale well. We now use a notification system based on the Message stack which functions much more generically and therefore can be applied to many content types on Drupal.org.
Follow functionality is now available for comments on Forum topics, Posts (like this one), Case Studies, and documentation Book Pages.
In the future we intend to extend this follow functionality to include notification of new revisions (for relevant content types, particularly documentation).

Community Elections for the Board


Nominations for the position of At-Large Director from the community are now open. There are two of these positions on the board, each elected on alternating years. For this year's elections process we've made several small refinements:
  • Candidates are now no longer required to display their real names on their candidate profile. We will now default to the Drupal.org username.
  • Candidates do not have to provide a photo, we will default to a generic avatar.
  • There is now an elections landing page with complete details about the elections process.
We encourage members of the community to nominate themselves!

Drupal.org Enhancements


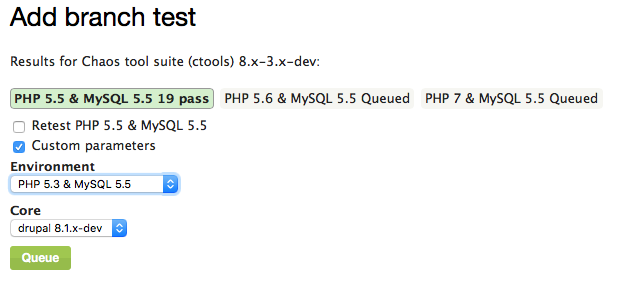
A number of smaller enhancements made it into the January sprints as well. One of the key ones was the ability to configure an arbitrary one-off test in the issue queues against a custom branch. This is a small step towards ensuring that the DrupalCI testing framework will support the wider testing matrix required for feature branching, so that Drupal can always be shippable.
We also spent some time in January reviewing the results of the documentation survey that was placed on all existing documentation pages on the site. This information is helping to inform the next big item on the roadmap - improved Documentation section on Drupal.org.
Finally, we've continued our battle against spam with the help of Technology Supporter, Distil Networks. We've seen some very promising results in initial trials to prevent spam account registrations from happening in the first place, and will continue to work on refining our integration.

Sustaining support and maintenance


DrupalCon New Orleans Full -Site Launched!

In January we also launched the full -site for DrupalCon New Orleans with registration and the call for papers. As part of this launch, Events.drupal.org now supports multiple, simultaneous event registrations with multiple currencies, payment processors, and invoice formats. This was a significant engineering lift, but has made Events.drupal.org even more robust.
DrupalCon New Orleans is happening from May 9-13th, and will be the first North American DrupalCon after the release of Drupal 8!

DrupalCon Dublin


The next European DrupalCon will also be here before you know it, and we've been working with the local community and our designer to update the DrupalCon Dublin splash page with a new logo that we will carry through into the design for the full-site once that is ready to launch.

Permissions for Elevated Users

In January we also focused on auditing the users with elevated privileges on Drupal.org, both to ensure that they had the permissions they needed, and to enforce our principle of least-access. Users at various levels of elevated privileges were contacted to see if they were still needed, and if not those privileged roles were removed.
The following privileges were also fixed or updated: webmasters can now view a user's' public ssh keys; content moderators can administer comments and block spam users without user profile editing privileges. We also fixed taxonomy vocabulary access and now both content moderators and webmasters have access to edit tags in various vocabularies such as Issue tags, giving more community members access to clean those up and fight duplicates or unused tags.

Updates traffic now redirects to HTTPS

SSL is now the default for FTP traffic from Drupal.org and for Updates.drupal.org itself. This helps to enforce a best practice of using SSL wherever possible, and helps to address an oblique attack surface where a man-in-the-middle could potentially hijack an update for someone running their Drupal installation on an unprotected network (i.e. development environments on a personal laptop in a coffee shop).

Devwww2 Recovery

Drupal.org pre-production environments were affected by some instability in January, particulary the devwww2 server. A combination of a hard restart due to losing a NIC on the machine and some file-system level optimizations in the database containers lead to corruption on the dev site databases. Drupal.org infrastructure engineers restored the system and recovered the critical dev sites, and while some instability continues the system has been recovering more cleanly as they work to resolve the issue permanently.

Friday, November 6, 2015

Building Custom cTools Plugins in Drupal 7

cTools is one of those critical Drupal 7 modules many others depend on. It provides a lot of APIs and functionality that makes life easier when developing modules. Views and Panels are just two examples of such powerhouses that depend on it.
cTools makes available different kinds of functionality. Object caching, configuration exportability, form wizards, dialogs and plugins are but a few. A lot of the credit you would normally attribute to Views or Panels is actually owed to cTools.
Drupal logo
In this article, we are going to take a look at cTools plugins, especially how we can create our very own. After a brief introduction, we will immediately go hands on with a custom module that will use the cTools plugins to make defining Drupal blocks nicer (more in tune to how we define them in Drupal 8).

Introduction

cTools plugins in Drupal 7 (conceptually not so dissimilar to the plugin system in Drupal 8) are meant for easily defining reusable bits of functionality. That is to say, for the ability to define isolated business logic that is used in some context. The goal is to set up that context and plugin type once, and allow other modules to then define plugins that can be used in that context automatically.
If you’ve been developing Drupal sites for more than a year you’ve probably encountered cTools plugins in one shape or form. I think the first plugin type we usually deal with is the content_type plugin which allows us to create our own custom panel panes that display dynamic content. And that is awesome. Some of the others you may have encountered in the same realm of Panels are probably context and access (visibility rules). Maybe even relationships and arguments. These are all provided by cTools. Panels adds to this list by introducing layouts and styles that we normally use for creating Panels layouts and individual pane styles. These are I think the more common ones.
However, all of the above are to a certain extent a black box to many. All we know is that we need to define a hook to specify a directory and then provide an include file with some definition and logic code and the rest happens by magic. Going forward, I would like us to look into how a plugin type is defined so that if the case arises, we can create our own plugins to represent some reusable bits of functionality. To demonstrate this, we will create a module that turns the pesky hook system of defining custom Drupal blocks into a plugin based approach similar to what Drupal 8 is using.
The final code (+ a bit more) can be found in this repository if you want to follow along. And I do expect you are familiar with the steps necessary for defining custom Drupal blocks.

The block_plugin module

As I mentioned, I would like to illustrate the power of cTools plugins with a custom plugin type that makes defining Drupal 7 blocks saner. Instead of implementing the 2 main hooks (hook_block_info() and hook_block_view()) necessary to define a block, we’ll be able to have separate plugin files each responsible for all the logic related to their own block. No more switch cases and changing the hook implementation every time we need a new block. So how do we do this?
First, let’s create our block_plugin.info file to get started with our module:
name = Block Plugin
description = Using cTools plugins to define Drupal core blocks
core = 7.x
dependencies[] = ctools
Simple enough.

The plugin type

In order to define our news plugin type, inside the block_plugin.module file we need to implement hook_ctools_plugin_type() which is responsible for defining new plugin types cTools will recognize:
function block_plugin_ctools_plugin_type() {
  return array(
    'block' => array(
      'label' => 'Block',
      'use hooks' => FALSE,
      'process' => 'block_plugin_process_plugin'
    )
  );
}
In this hook we need to return an associative array of all the plugin type definitions we need keyed by the machine name of the plugin type name. Today we are only creating one called block. For more information on all the options available here, feel free to consult the plugins-creating.html help file within the cTools module. No use repeating all that information here.
The process key defines a function name that gets triggered every time cTools loads for us a plugin and is responsible for shaping or massaging the plugin data before we use it. It’s sort of a helper function that prepares the plugin for us each time so we don’t have to bother. So let’s see what we can do inside that function:
function block_plugin_process_plugin(&$plugin, $info) {
  // Add a block admin title
  if (!isset($plugin['admin title'])) {
    $exploded = explode('_', $plugin['name']);
    $name = '';
    foreach ($exploded as $part) {
      $name .= ucfirst($part) . ' ';
    }
    $plugin['admin title'] = $name;
  }

  // By default we also show a block title but this can be overwritten
  if (!isset($plugin['show title'])) {
    $plugin['show title'] = TRUE;
  }

  // Add a block view function
  if (!isset($plugin['view'])) {
    $plugin['view'] = $plugin['module'] . '_' . $plugin['name'] . '_view';
  }

  // Add a block form function
  if (!isset($plugin['configure'])) {
    $plugin['configure'] = $plugin['module'] . '_' . $plugin['name'] . '_configure';
  }

  // Add a block save function
  if (!isset($plugin['save'])) {
    $plugin['save'] = $plugin['module'] . '_' . $plugin['name'] . '_save';
  }
}
This callback receives the plugin array as a reference and some information about the plugin type. The task at hand is to either change or add data to the plugin dynamically. So what do we achieve above?
First, if the developer hasn’t defined an admin title for the block plugin, we generate one automatically based on the machine name of the plugin. This is so that we always have an admin title in the Drupal block interface.
Second, we choose to always display the title of the block so we mark the show title key of the plugin array as TRUE. When defining the block plugin, the developer has the option of setting this to FALSE in which case we won’t show a block title (subject).
Third, fourth and fifth, we generate a callback function for the block view, save and configure actions (if they haven’t already been set by the developer for a given plugin). These callbacks will be used when implementing hook_block_view(), hook_block_configure() and hook_block_save(), respectively. We won’t be covering the latter two in this article but feel free to check out the repository to see what these can look like.
And that’s pretty much all we need for defining our custom plugin type. We should, however, also implement hook_ctools_plugin_directory() which, as you may know, is responsible for telling cTools where a plugin of a certain type can be found in the current module:
function block_plugin_ctools_plugin_directory($module, $plugin) {
  if ($module == 'block_plugin' && in_array($plugin, array_keys(block_plugin_ctools_plugin_type())) ) {
    return 'plugins/' . $plugin;
  }
}
This will need to be implemented also by any other module that wants to define block plugins.

Drupal blocks

Now that we have the plugin type, let’s write the code which turns any defined block plugin into a Drupal block. Will start with the hook_block_info() implementation:
function block_plugin_block_info() {
  $blocks = array();

  $plugins = block_plugin_get_all_plugins();
  foreach ($plugins as $plugin) {
    $blocks[DELTA_PREFIX . $plugin['name']] = array(
      'info' => $plugin['admin title'],
    );
  }

  return $blocks;
}
Here we load all of the plugins using a helper function and define the minimum required information for the block. Here you can add also more information but we are keeping it simple for brevity.
We know each plugin will have a machine name (the name of the include file basically) and an admin title because we generate one in the processing phase if one doesn’t exist. The DELTA_PREFIX is a simple constant in which we define the prefix we want for the block machine name because we need to reuse it and should be able to easily change it if we want to:
define('DELTA_PREFIX', 'block_plugin_');
Our helper function we saw earlier looks like this:
function block_plugin_get_all_plugins() {
  return ctools_get_plugins('block_plugin', 'block');
}
It’s a simple wrapper around the respective cTools function. And for that matter, we also have the following function responsible for loading a single plugin by its machine name:
function block_plugin_get_plugin($name) {
  return ctools_get_plugins('block_plugin', 'block', $name);
}
This is very similar to the one before.
In order to make our Drupal block definitions complete, we need to implement hook_block_view():
function block_plugin_block_view($delta = '') {
  $plugin = block_plugin_plugin_from_delta($delta);
  if (!$plugin) {
    return;
  }

  $block = array();

  // Optional title
  if (isset($plugin['title']) && $plugin['show title'] !== FALSE) {
    $block['subject'] = $plugin['title'];
  }

  // Block content
  $block['content'] = $plugin['view']($delta);

  return $block;
}
So what’s happening here?
First, we use another helper function to try to load a plugin based on the delta of the current block and do nothing if we are not dealing with a plugin block.
Second, we build the block. If the user specified a title key on the plugin and the show title key is not false, we set the subject of the block (its title basically) as the former’s value. As for the actual block content, we simply call the view callback defined in the plugin. And that’s it.
Let us quickly see also the helper function responsible for loading a plugin based on a block delta:
function block_plugin_plugin_from_delta($delta) {
  $prefix_length = strlen(DELTA_PREFIX);
  $name = substr($delta, $prefix_length);
  $plugin = block_plugin_get_plugin($name);
  return $plugin ? $plugin : FALSE;
}
Nothing complicated going on here.

Defining block plugins

Since we told cTools that it can find block plugins inside the plugins/block folder of our module, let’s go ahead and create that folder. In it, we can add our first block inside a file with the .inc extension, for example my_block.inc:
<?php

$plugin = array(
  'title' => t('This is my block'),
);

/**
 * Returns a renderable array that represents the block content
 */
function block_plugin_my_block_view($delta) {
  return array(
    '#type' => 'markup',
    '#markup' => 'Yo block!'
  );
}
Like we do with all other plugins (content_type, context, etc), the plugin definition is in the form of an array inside a variable called $plugin. And for our case all we need at this point is a title (and not even that since without it the block simply won’t show a title).
Below it, we defined our callback function to display the block. The naming of this function is important. It matches the pattern we used for it during the processing phase (module_name_plugin_name_view). If we want to name it differently, all we have to do is reference the function name in the view key of the $plugin and it will use that one instead.
And that is basically it. We can now clear our caches and go to the Block administration screen where we can find our block and add it to a region. Showing that block on the page should trigger the view callback for that block plugin and render the contents.