IntroductionIt is quite common to have the need to password protect a certain file or a set of files, in order to prevent unauthorized access to those files. There are many different alternatives on how to do this including, sessions, cookies, JavaScript and HTTP authentication. The latter of these is what we are going to concentrate on in this article.
Usually this form of authentication is called Apache HTTP Authentication as it is only available for Apache based web server. To be honest, that is a lie as it is also possible with Microsoft's IIS web server, however, is much more difficult to implement and requires many configuration changes in order for it to run successfully. Hence, we will only focus on getting this working under Apache.
Apache
For those of you who don't know what Apache is, it is a web server. Therefore, it is the 'program' that is running PHP and that accepts incoming requests for web pages and sends out the correct data. As we are focusing on Apache in this article, it is important to know if you are running Apache or not. This is fairly simple to find out, using thephpinfo() function. Simple create a PHP page with the following code:
phpinfo();
?>
?>
Run this new file and you should get an output which contains a lot of information about your current PHP setup. The most important section is the top section, and should look something like the following:
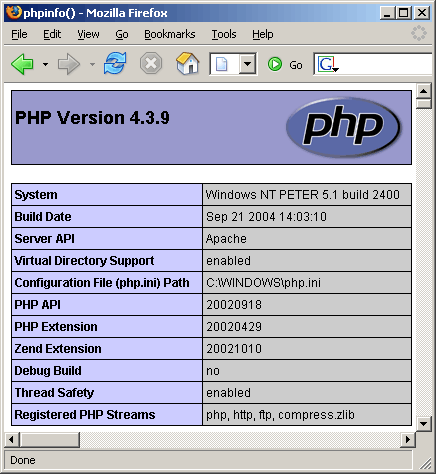
Look at the Server API field and make sure that it says Apache. If it does, then you are running the perfect configuration – Apache with PHP as a module. The field may say CGI, if it does, you will have to scroll down the page, and check if there is an 'Apache' section. If there isn't, it is likely that you aren't running Apache, hence this article probably won't be of much use. If you want, you can always install Apache on your PC by checking out this auto-installer.
If you are running Apache and CGI-mode, then there is a slight chance that the code supplied will not work, however, I have modified it so that your chances are quite high. By default though, HTTP Authentication doesn't work in CGI mode, however with a small trick it can be made to work.
What is HTTP Authentication?
You may not consciously know what HTTP Authentication is; however, it is most likely that you have used it once or twice, if not many of times. It is used commonly as login interfaces to the administration areas of some PHP scripts, as well as some popular websites, such as vBulletin.com. To refresh your memory, here is a small image of the login process:
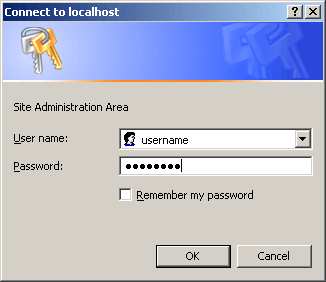
Now that you know what HTTP Authentication is, it's time to find out how to implement it for single and multiple files.
Protecting Single and Multiple FilesWe are going to start off adding password protection to a single file, and then modify that so we add it to multiple files. The way HTTP authentication works, is by using HTTP headers which the browser and the web server (Apache) both understand. By using the correct headers we can produce a page which asks for the user to login. If the entered information is correct, we show the page, otherwise we show a nice error message.
Protecting Single and Multiple FilesWe are going to start off adding password protection to a single file, and then modify that so we add it to multiple files. The way HTTP authentication works, is by using HTTP headers which the browser and the web server (Apache) both understand. By using the correct headers we can produce a page which asks for the user to login. If the entered information is correct, we show the page, otherwise we show a nice error message.
As I mentioned, the basis of HTTP authentication is using HTTP headers, which are accessible by using the PHPheader() function. This specifics of this function have been explained before in great detail in Speed Limit File Downloads. However, for the sake of drilling it into your brains, the most important thing about the header() function is that there can be no output to the browser before calling header(). If there is, you will receive a nasty error and the script will cease to function.
Here's the code:
HTTP Authenticationif (@$_SERVER['PHP_AUTH_USER'] != 'john' && @$_SERVER['PHP_AUTH_PW'] != 'secret') {
header('WWW-Authenticate: Basic realm="Site Administration Area"');
header('Status: 401 Unauthorized');
/* Special Header for CGI mode */
header('HTTP-Status: 401 Unauthorized');
header('Status: 401 Unauthorized');
/* Special Header for CGI mode */
header('HTTP-Status: 401 Unauthorized');
?>
Access Unauthorized
Access to the requested page denied
You have been denied access to this page for entering an
incorrect or non-exist username and password.
You have been denied access to this page for entering an
incorrect or non-exist username and password.
Press 'Refresh' to retry the login procedure.
exit;
}
}
echo 'Welcome to our site, username ' . $_SERVER['PHP_AUTH_USER'];
?>
This code contains all the important aspects of HTTP authentication that you need to get started. First thing to notice is that there is no output before header() calls. Secondly, notice that we have two special variables inside the$_SERVER superglobal. These are PHP_AUTH_USER and PHP_AUTH_PW and they represent the current HTTP authenticated username and password. As they may not exist when we call our script, I have placed an 'at' symbol (@) before both of these variables. The @ symbol tells PHP to suppress any errors that may arise in the specified statement. Hence, we know that an error might occur because these variables may not yet exist, so we use @ to suppress it.
The way the headers are written are very important using this method of authentication, as very slight changes can result in the login procedure not working and everyone having access to your file(s). It is important that the orders of the headers are correct and that the actual content is correct. For example, for maximum compatibility, the B in Basicmust be capital, as well as the text in realm being surrounded in double quotes, not single.
In the first header, we have a realm option. This is where we can place some text that will go on our username / password request form. You shouldn't place too much text here, just a basic description of what the user is logging in to.
The usage of this script is a little strange to visualize, because first we check if the user is logged in, and if not, then we send some headers and then end the script. If actual usage, after the headers are sent, the browser waits from the input from the user. Once the user clicks on the OK button, it will then reload the script, to check if the username and password combination are correct. If not it will display the login again (up to three times), and then upon failure will show the error page. If the username is correct, it skips the headers section, and just displays the normal content of your script.
Securing Multiple Files
Most of the time when you are password protecting an area on your website, you will need to secure more than one page. What you would then do, if move all the above code into an include file, and then include the file on any page that you want to password protect. This could become cumbersome, especially if you are already including many files. The alternative is to convert this into a function, so that you can add it into a function library file (which you might already have). This way, the code is always available, and we can make it a little more reuseable.
Reusable Codefunction validateUser ($fUsername = 'john', $fPassword = 'secret') {
if (@$_SERVER['PHP_AUTH_USER'] != $fUsername && @$_SERVER['PHP_AUTH_PW'] != $fPassword) {
if (@$_SERVER['PHP_AUTH_USER'] != $fUsername && @$_SERVER['PHP_AUTH_PW'] != $fPassword) {
header('WWW-Authenticate: Basic realm="Site Administration Area"');
header('Status: 401 Unauthorized');
/* Special Header for CGI mode */
header('HTTP-Status: 401 Unauthorized');
header('Status: 401 Unauthorized');
/* Special Header for CGI mode */
header('HTTP-Status: 401 Unauthorized');
?>
Access Unauthorized
Access to the requested page denied
You have been denied access to this page for entering an
incorrect or non-exist username and password.
You have been denied access to this page for entering an
incorrect or non-exist username and password.
Press 'Refresh' to retry the login procedure.
exit;
}
}
?>
}
}
?>
Now we have a function called validateUser which takes two parameters; $fUsername and $fPassword. These are the username and password that you want the user to login with. I have also added default values so that if you do not specify a username or password (maybe you forget to), then the user can log in with the default values.
This function can then be added to a library file of functions. These are used to hold commonly used functions in your programs and are usually necessary if you are writing a lot of scripts. Commonly, I use global.php for my library functions.
index.phprequire_once('globa.php');
validateUser('john', 'newsecret');
validateUser('john', 'newsecret');
echo 'Welcome to our secret area!';
?>
?>
Here I have assumed that you have placed the function into a file called globa.php so that we can include it. I have used require_once() to include the file, so that if PHP cannot find the file, the script will exit and also the file will not be included more than once. Now to run the authentication routine, we just make a simple call to validateUser() with the username and password we expect the user to log in with.
These examples are useful if you only have one or two people logging into your site and they share the same username. However, sometimes you may want to allow a multitude of people to access this area. For this, it is common to use databases.
Allowing Multiple UsersThere are two main methods of allowing multiple users password protected access to your website. The first being username/password files and the second being username/password tables in a database. As many people use database nowadays, I will now focus on this method. In order to implement a file based version of this script, you will have to save usernames and passwords to a file (username,password on each line). You would then read each line, and check if the username and password match.
Allowing Multiple UsersThere are two main methods of allowing multiple users password protected access to your website. The first being username/password files and the second being username/password tables in a database. As many people use database nowadays, I will now focus on this method. In order to implement a file based version of this script, you will have to save usernames and passwords to a file (username,password on each line). You would then read each line, and check if the username and password match.
Back to the main topic of databases! They are useful in this sense, and often websites have a dynamic Content Management System (CMS) for their website which has allows for several users or authors to access this area. The author data is already stored in the database, so there is no need to add a file or more data. I'm going to assume you know a little about how to access MySQL databases in this section, but don't worry, it should be too difficult.
To start of with, we need a table of the usernames and passwords. This is SQL which can be executed by running MySQL via the command line, or by using a script such as phpMyAdmin.
CREATE TABLE 'users' (
'userID' INT NOT NULL AUTO_INCREMENT,
'username' VARCHAR( 20 ) NOT NULL ,
'password' VARCHAR( 20 ) NOT NULL ,
PRIMARY KEY ( 'userID' ) ,
UNIQUE ( 'username')
);
'userID' INT NOT NULL AUTO_INCREMENT,
'username' VARCHAR( 20 ) NOT NULL ,
'password' VARCHAR( 20 ) NOT NULL ,
PRIMARY KEY ( 'userID' ) ,
UNIQUE ( 'username')
);
Now, let's enter a few users:
INSERT INTO 'users' ( 'userID' , 'username' , 'password' )
VALUES ( '', 'john, 'secret');
VALUES ( '', 'john, 'secret');
INSERT INTO 'users' ( 'userID' , 'username' , 'password' )
VALUES ( '', 'peter', 'othersecret');
VALUES ( '', 'peter', 'othersecret');
INSERT INTO 'users' ( 'userID' , 'username' , 'password' )
VALUES ( '', 'billy', 'ilovecats');
VALUES ( '', 'billy', 'ilovecats');
Now we have our database table setup called users. On my computer, I have this table in a database called myCms so we will use that in our examples.
To get going, we must first connect to the database. At the same time, we are also going to convert all this into our own function so that it is again reusable in the future.
Connect
function validateUser () {
mysql_connect('dbusername', 'dbpassword', 'localhost') or die(mysql_error());
mysql_select_db('myCms') or die(mysql_error());
function validateUser () {
mysql_connect('dbusername', 'dbpassword', 'localhost') or die(mysql_error());
mysql_select_db('myCms') or die(mysql_error());
}
?>
Here we have connected to the database using our database name and password. You must change the username and password for your setup. We then select our database (myCms). If any errors occur the script is terminated and the error is outputted using die(mysql_error()). This is especially useful in determining any bugs in your scripts.
Now we must query the database and check if the username and password that has been entered is correct:
function validateUser () {
mysql_connect('dbusername', 'dbpassword', 'localhost') or die(mysql_error());
mysql_select_db('myCms') or die(mysql_error());
mysql_connect('dbusername', 'dbpassword', 'localhost') or die(mysql_error());
mysql_select_db('myCms') or die(mysql_error());
$user = @addslashes($_SERVER['PHP_AUTH_USER']);
$password = @addslashes($_SERVER['PHP_AUTH_PW']);
$password = @addslashes($_SERVER['PHP_AUTH_PW']);
$sql = "SELECT Count(*) as Number FROM users WHERE username='" . $user . "' AND password='" . $password . "'";
$query = mysql_query($sql) or die(mysql_error());
$query = mysql_query($sql) or die(mysql_error());
$result = mysql_fetch_array($query);
$NumberOfUsers = $result['Number'];
$NumberOfUsers = $result['Number'];
}
?>
?>
This may be a little daunting but it is simple in essence. All we have done, is modified the input username and password by calling addslashes() on them. This is a security issue and should always be performed on user input to database, to prevent them from gaining unauthorized access.
We then have our query, which selects (gets) numbers of records that meets our conditions. Our conditions state the username and password must match the ones that the user has entered.
Following this, we execute the query, get the results and then assign the result called Number to a variable called$NumberOfUsers so that we can use it. Now all that's left to do, is the standard header output:
Altogether Now
function validateUser () {
mysql_connect('dbusername', 'dbpassword', 'localhost') or die(mysql_error());
mysql_select_db('myCms') or die(mysql_error());
function validateUser () {
mysql_connect('dbusername', 'dbpassword', 'localhost') or die(mysql_error());
mysql_select_db('myCms') or die(mysql_error());
$user = @addslashes($_SERVER['PHP_AUTH_USER']);
$password = @addslashes($_SERVER['PHP_AUTH_PW']);
$password = @addslashes($_SERVER['PHP_AUTH_PW']);
$sql = "SELECT Count(*) as Number FROM users WHERE username='" . $user . "' AND password='" . $password . "'";
$query = mysql_query($sql) or die(mysql_error());
$query = mysql_query($sql) or die(mysql_error());
$result = mysql_fetch_array($query);
$NumberOfUsers = $result['Number'];
$NumberOfUsers = $result['Number'];
if ($NumberOfUsers != 1) {
header('WWW-Authenticate: Basic realm="Site Administration Area"');
header('Status: 401 Unauthorized');
/* Special Header for CGI mode */
header('HTTP-Status: 401 Unauthorized');
header('Status: 401 Unauthorized');
/* Special Header for CGI mode */
header('HTTP-Status: 401 Unauthorized');
?>
Access Unauthorized
Access to the requested page denied
You have been denied access to this page for entering an
incorrect or non-exist username and password.
You have been denied access to this page for entering an
incorrect or non-exist username and password.
Press 'Refresh' to retry the login procedure.
exit;
}
}
}
}
?>
This is essentially the same as the code of the previous page, however this time, as we have queried the database for the number of users where the username/password match, we do not have to again check the input username/password. Instead, we have the number of users with the correct match – this should equal to 1 or 0, and never more. Hence, we check if the number does not equal to 1, if so, we send the headers.
As we have defined this all in a function, we can again move this into a library file and now we can call this on every page using this method:
Multiple Pages
require_once('global.php');
validateUser();
require_once('global.php');
validateUser();
echo 'Welcome to the secured area!';
?>
?>
This is almost the same as previously, except there are no parameters for the validateUser() function as all the username / password combinations are taken from the database.
I hope this article has helped you gain an understanding on how to password protect your website using this simple but efficient method. You should now try it out for yourself, or maybe consider implementing the file based version.
No comments:
Post a Comment
Thanks for your comment.